Posts

Showing posts with the label A Way With Words

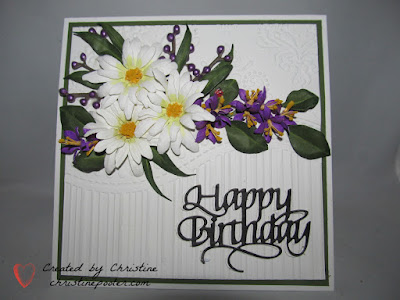
Oh Happy Daisy

Image
Hello My Crafty Friends, Hope you all had a great Mother's Day at least the best you could under the circumstances.  I am sure it was much different than any other you have celebrated.  Our lives are turned upside down right now I do hope that creating beautiful things has gotten you through so far. Early fall we will have a brand new release of Susan's wonderful dies with Spellbinders I can't wait but until then we are using her old releases which I know are hard to find but there are some out there. Here is a card I created for you using Susan's Garden Notes Shasta Daisy and Jasmine along with Suzanne Cannon - A Way With Words - Happy Birthday Small.  The embossing folder is one that came in a magazine several years ago but not sure and there is no brand name on it. Created a 6" X 6" card base from white Soft Finish Cardstock.  Cut green cardstock 5-3/4" square adhered to card front using Clear Double Sided Adhesive.  White Soft Finish Cardstock was cut...

Hyacinth Hello

Image
  Hello My Crafty Friends, Well it is Spring although today we got snow again so paper gardening was in order. My card today has a very popular spring flower - Susan's Garden Notes - Hyacinth. My card is a 6" X 6" tent fold card.  Card base was created using white Soft Finish Cardstock cut 6" X 12" scored at 6" and folded on score line. Used Susan's Garden Notes Frame It - Rectangles die set to cut opening in card front.  I am lucky I have some 8-1/2" X 11" embossing folders  used one to emboss front of card base. Distress Oxide Sprays in various colors were used on photo paper to create background piece then adhered to back of card front using Clear Double Sided Adhesive behind opening. 5 Hyacinths were created in different colors cut from white Soft Finish Cardstock then colored with Copic Markers.  Stems and leaves were cut from green cardstock - I cut the leaf  off  stem and used separately. From gray cardstock with Clear Double Sided Adhe...

Flame Lily Birthday

Image
Hello my crafty friends welcome to my blog! Today I have a card I created using Susan's new Garden Notes Flame Lily die set.  This is my first attempt will continue to work on them. Here is how card was created. Step 1   Create card base from 110# white Soft Finish Cardstock .  Mine is 5-7/8" square instead of 6" square as I wanted my embossing folder to work. Step 2   Cut white Soft Finish Cardstock 5-7/8" square then emboss.  I trimmed away the top part of embossed piece along curved line.  Although I don't know the name of my embossing folder or the maker I did look on line and found that Joyful Home and Tatter Lace do make some similar ones.  Using Clear Double Sided Adhesive to attach embossed piece to card front. Step 3   From 110# white Soft Finish Cardstock cut 3 Garden Notes Flame Lily cut leaves and stamen from green cardstock.  Using alcohol markers in colors of your choice color petals  (I have 2 red and yellow and 1 pu...

Spring Crocus

Image
Hello my crafty friends, Today my card features Susan's Garden Notes new Crocus and Garden Fence dies along with Suzanne Cannon's A Way With Words 4 Seasons die set. Here is how the card was created. Step 1   form 6" X 6" card base from color cardstock of your choice. Step 2  Cut white Soft Finish Cardstock 5-3/4" X 5-3/4".  Using next to smallest die in Garden Notes Frame It - Stitched Rectangle die set cut rectangle 1/2" down from top and allowing approximately 1-1/2" on each side cut opening. Step 3  Either use piece of patterned paper or make your own background piece attach to back of opening.   Adhere to card front using Clear Double Sided Adhesive . Step 4  Cut 10-12 crocus from white Soft Finish Cardstock cut leaves from green cardstock. Color flower petals using alcohol markers ( Copics Y15, Y38, V12 and V17   Using Susan's 4 pc. All Metal Tool Kit and Molding Mat shape petals.  Cut stamen from yellow cardstock roll...

Happy Birthday Friend

Image
Welcome to my blog my friends, Today I am posting a birthday card that I made for a very special friend since grade school which is a very long time trust me hehehe.  Obviously being December 1st I have done a wintery card Here is how I created my card. Step 1  Cut 2 (1 with Clear Double Sided Adhesive on back and 1 without adhesive)  Garden Notes Berry Branch from brown cardstock.  Adhere 1 on top of other.  Add berries using Nuvo Crystal Drops Simply White.  Set aside to dry then repeat on the back. Step 2  Cut 2 Garden Notes Hawthorne from green cardstock and shade.  Using Nuvo Crystal Drops Autmun Red add berries set aide to dry then repeat for back side.  Susan has a good video which can be found here . Step 3  Form 6" X 6" card base. Cut brown cardstock 5-3/4" X 5-3/4" using 6th die in Garden Notes Frame It / Stitched Squares cut opening in upper left.  Cut patterned paper to fit opening ( ModaScrap Woods used here) ad...

Hohoho Treat Boxes

Image
Hello My Crafty Friends - Welcome to my blog! Today I have a fun and quick little gabled treat box.  This sweet little box can be used for any occasion. Susanne Cannon designed this sweet die for the box along with die set for the mittens, and hohoho. Be sure to check out all the sweet Gable Boxes others have created here  at this link https://blog.elizabethcraftdesigns.com/2018/11/gable-box-christmas-finery/ This little box can be used for any occasion and is so easy to create. Here is how I created these boxes. Step 1   Using Suzanne Cannon's A Way With Words Gable Box die cut box from cardstock of choice (holographic used here). Step 2   Fold on all crease lines.  Using bone folder go over all folds making sure they are well creased. Step 3   Add Clear Double Sided Adhesive on long narrow tab as well as on one of large bottom flaps remove protective covering adhere to form box. Step 4  Using  A Way With Words - Flourished Christmas Minis di...

Seasons Greetings Cornucopia

Image
  Hello my crafty friends welcome to my blog. Once again it is challenge time for Elizabeth Craft Designs Design Team.  This month our challenge is to create a Christmas card using flowers and or foliage.  My card today uses Susan's Garden Notes Small Poinsettia ,  newly released Hawthorne Berries and Pine Boughs along with new Garden Notes Cornucopia . Be sure to visit Elizabeth Craft Designs Blog to see what all the other design team members have created and enter for a chance to win  $20.00 gift card.  The question for this month is -  Which Elizabeth Craft Designs flower or foliage die or stamp set would you chose to create a Christmas card or decoration.   Here is how my card was created. Step 1   Cut 2-3 Garden Notes Hawthorne Berries from either green cardstock or white Soft Finish Cardstock .  If cut in green cardstock shade using Distress Ink if cut in white color with alcohol markers (green cardstock used here)....

Breast Cancer Awareness - Hope

Image
Welcome My Crafty Friends, Today on Elizabeth Craft Designs Blog I have a card I did for Breast Cancer Awareness.  My card is dedicated to our one wonderful designer Susan Tierney-Cockburn in memory of her daughter Kelly who lost her battle to this terrible disease.  Full tutorial on Elizabeth Craft Designs Blog be sure to check it out.    Elizabeth Craft Designs Blog

Sunflower Hugs

Image
Welcome my crafty friends! Today I have a card I created using Susan's Garden Notes Canning Jar & Lid, Garden Notes Sunflower 2, Garden Notes Lavender along with Suzanne Cannon's Sending Hugs Kisses die set.  ModaScrap - Wood Series patterned paper was also used. Here is how card was created. Step 1   Form 6" X 6" card base. Step 2   Cut ModaScrap -  Wood pattern paper 5-3/4" square.  Adhere to card front using Clear Double Sided Adhesive . Step 3   Using Garden Notes Lavender die set cut 1 stem from green cardstock shade with Distress Ink.  Cut plate of florets 10-16 times from yellow cardstock.  Place right side up on hard rubber pad / art eraser using toothpick cup each floret.  Using Kids Choice Glue attach florets to stem base forming Goldenrod. Step 4   Die cut Garden Notes Canning Jar twice from clear sticker paper.  Using Copic Markers color 1 jar first using Y13 color whole thing.  Then use E39 color leav...

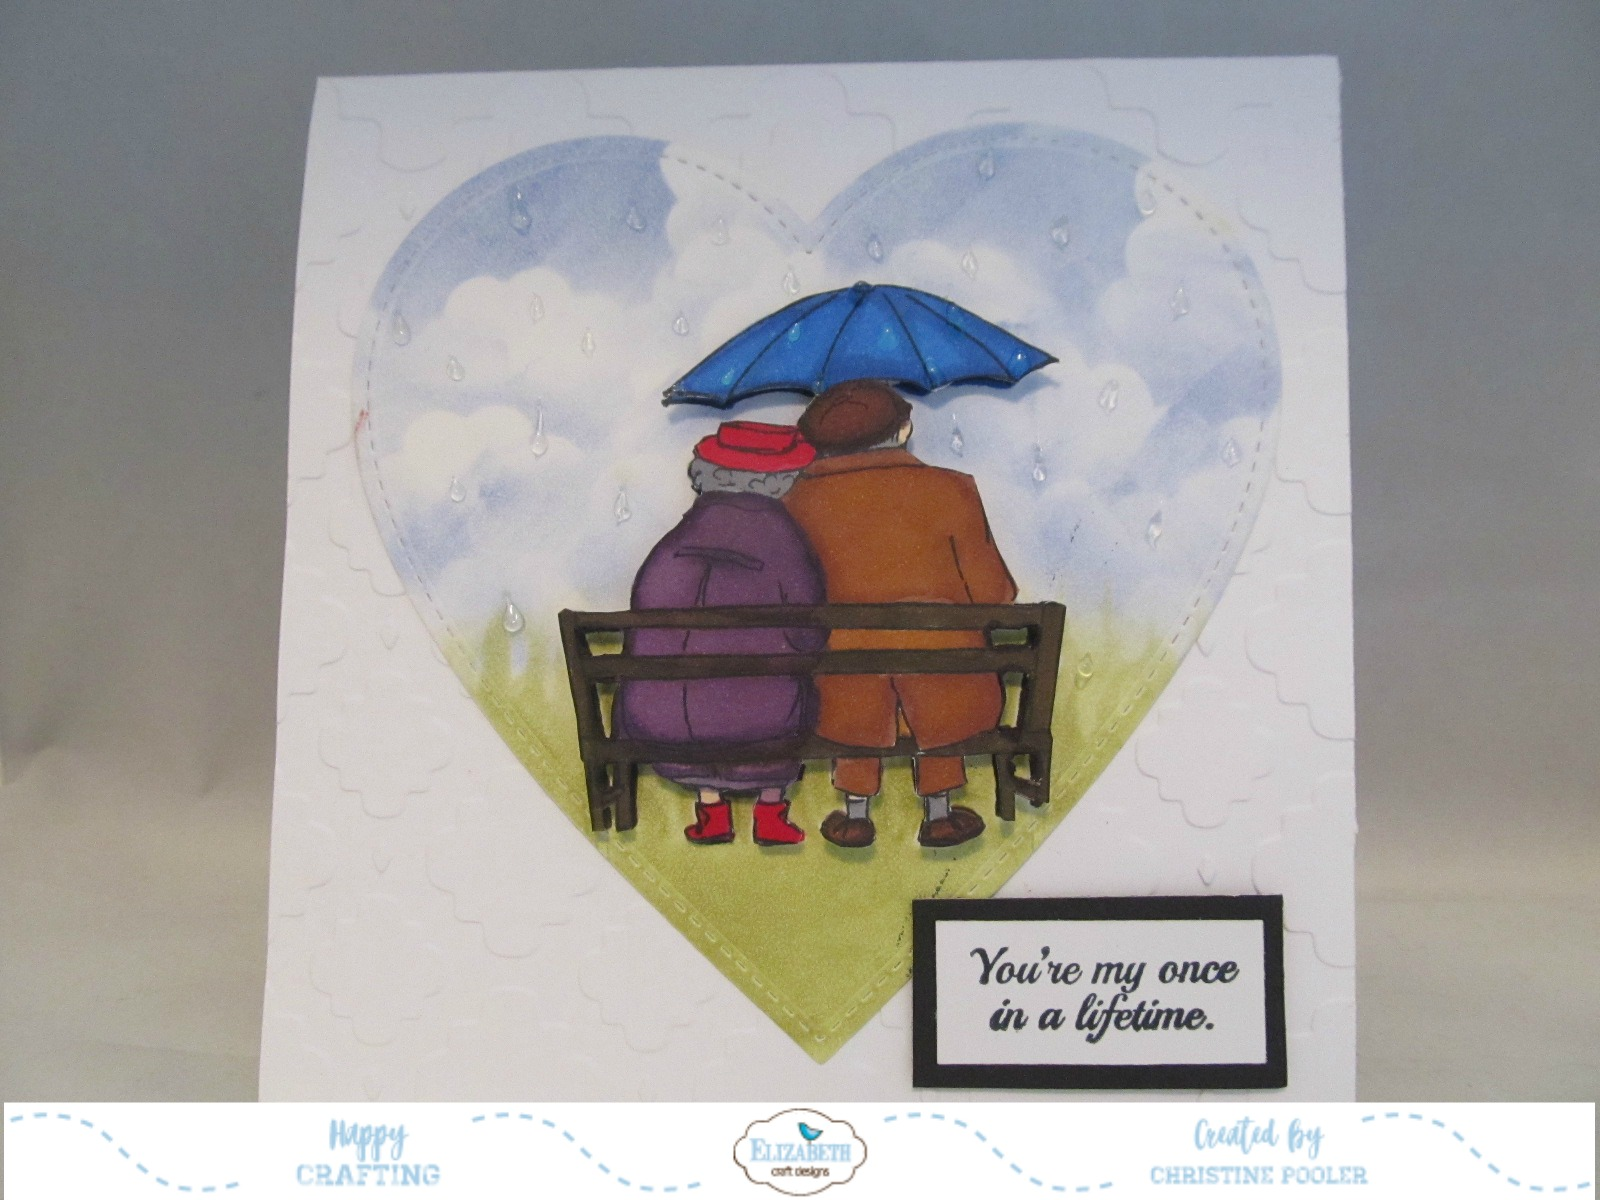
My Once In A Lifetime

Image
Hello my crafty friends welcome to my blog! Today I have an anniversary card which I made for my hubby to celebrate our 49th anniversary.   For this card I combined using dies as well as old school of stamping and fussy cutting for my main image. Here is how it was created. Step 1   From white Soft Finish Cardstock cut heart using Els van de Burgt Studio Stitched Hearts - 4th largest die.  Using Susan's Garden Notes Earth & Sky Stencil and PanPastels Set 2 blue for sky green for grass. Step 2   Using black ink stamped couple on bench twice onto white Soft Finish Cardstock .  Using alcohol markers color both images then fussy cut both.  Kids Choice Glue adhere 1 image to heart. Step 3   Using clear Nuvo Crystal Drops add raindrops to heart and umbrella of second image.  Set aside to dry. Step 4   Form 6" X 6" tent fold card base.  Emboss front of card with embossing folder of your choice. Step 5   For inside of card c...

Happy 4th

Image
Hello my crafty friends welcome to my blog and Happy 4th of July to all that celebrate it! Today I have a quick little post for you.  I like to make treat boxes for different holidays for my co-workers fill them with some candy and have a prize for 1 lucky winner.  So when A Way With Words came out with this new Gable Box I just had to use it. Made a total of 24. Here is how I did it. Step 1   From white Soft Finish Cardstock using A Way With Words Gable Box die cut t box. Step 2   Using yellow ink random stamp stars on box using Joset's Summer Fun Sentiment Stamp Set. Step 3   Crease on all fold lines well then assemble box using Clear Double Sided Adhesive . Step 4   Using Joset's 4th of July die set cut flag and large burst.  Attach burst to box front using a bit of Clear Double Sided Adhesive then add a bit of Kids Choice Glue on back of flag pole attach to box. Step 5   From black cardstock with Clear Double Sided Adhesive on back...

Forever Friends Lilac

Image
  Welcome My Crafty Friends, Today I am posting another "Forever Friends" card.  Last month I posted a card I had made for my dear friend of over 50 years it had bachelor buttons on it well she showed it to a friend where she lives and the friend wanted a couple of cards one of which was just like hers and another one so here it is.  I chose to use Susan's Garden Notes Lilac 2 die set. Here is how it was created. Step 1   From green cardstock cut Garden Notes Leafy Branch .  Using Nuvo Crystal Drops - Simply White add berries to branch set aside to dry then repeat on back. Step 2   Form 6" X 6" card base from white cardstock. Step 3   Cut patterned paper 5-3/4" X 5-3/4" patterned paper ( ModaScrap Fly & Scrap used here).  Adhere to card front using Clear Double Sided Adhesive . Step 4  From black cardstock with Clear Double Sided Adhesive on back cut Forever Friends using A Way With Words dies Forever and Friends .  Adhere to car...

AWWW Focus Day

Image
Welcome My Crafty Friends! Today is another Focus Day on Elizabeth Craft Designs Blog.  The Design Team has been busy creating cards that are showcasing A Way With Words brand new release of dies.  I have chosen Miss You and Long Stem Rose to showcase.  Be sure to visit Elizabeth Craft Designs Blog at this LINK to see what other design team members have created using the new dies. Here is how card was created. Step 1  Form 6" X 6" card base. Step 2  Cut patterned paper 6" X 6" using largest oval from newly released Garden Notes Frame It - Stitched Ovals die cut oval in center.  Attach to card front using Clear Double Sided Adhesive . Step 3   From green cardstock cut set of Garden Notes Ladder Fern shade with ink shape by pinching up fronds around tweezers from Garden Notes Tool Kit .  Using Kids Choice Glue on just on lower portion of stem adhere to card front inside oval. Step 4   From 2 shades of patterned paper using new releas...

Forever Friends

Image
Hello My crafty friends, My post today on Elizabeth Craft Designs Blog.  This is  a card I designed for Elizabeth Craft Designs Design Team using  dies from Susan's Garden Notes, ModaScrap and A Way With Words.   You can find tutorial for this card on Elizabeth Craft Designs Blog   Elizabeth Craft Designs Supplies

Joset's New Release Backyard Barbecue

Image
Hello My Crafty Friends! Here is a second card I did using one of Joset's new releases the Backyard Barbecue and Lanterns .  I had just seen the Impossible Card and when I saw the BBQ set and the Lanterns I knew I had to make this card. Step 1   For how to video on making the card base go to this LINK Step 2   Cut off white cardstock 3-1/2" X 4-1/4" emboss with "Brick" embossing folder.  Using Clear Double Sided Adhesive adhere to center pop up section. Step 3  Die cut all pieces you wish to use on your card using Joset's newly released Backyard Barbecue and Lanterns die sets.  For picnic table use 1/4" strips of brown cardstock.  Using Clear Double Sided Adhesive build your card scene. Step 4   Using A Way With Words - 4 Seasons die set cut Summer 1 from green cardstock with Clear Double Sided Adhesive on back and 1 from off white cardstock.  Adhere green on top of off white off setting a bit to give shadow effect. I do hope you ...

Framed Bouquet

Image
Welcome my crafty friends! Today my post is a card I designed for Elizabeth Craft Designs Design Team.  This card is posted on Elizabeth Craft Designs Blog with a full tutorial. Elizabeth Craft Designs Supplies Other Supplies Cardstock - 2 shades of green Nuvo Crystal Drops - Rhubarb Crumble Copic Markers Embossing Folder - Wood Grain used here

Week 14 Christmas Card Challenge - Snowy Trees

Image
Hello my crafty friends! Well this is week 14 of a Christmas Card Challenge I am in with Card Making Tips group on Facebook.  With this post I am caught up with posting my cards so you will only see 1 Christmas card post from me a week for now.  This weeks challenge is Snowy Trees - not decorated.  Elizabeth Craft Designs had the perfect die set for this plus their new Happy Frame which I am loving. Here is a quick tutorial on how I made this card. Step 1   Using Becky Seddon's Reindeer Die Set cut 9 or 10 trees from dark green cardstock and 3 snow mounds from white cardstock.  Using a pallet knife add Snow Accents to snow mounds and trees set aside to dry.   Note: With this snow be careful on snow mounds to keep away from each end and the bottom  edge as the frame will not lay flat against card and adhere. Step 2    Using ModaScraps Happy Frame Die Set cut 4 pieces to make frame from navy cardstock.  Crease all fold lines us...

Tulips

Image
Hello my crafty friends! Today my post is a card I designed using a picture from Facebook as my inspiration and a little hope that we shall see tulips coming up here in Maine soon even though as I am looking out my window it is snowing hard. Here is how the card was made. Step 1   - Card Base is 6" X 6".  Cut dark chocolate Soft Finish Cardstock 6" X 12" score at 6" fold on score line.  Cut white Soft Finish Cardstock 5-1/2" X 5-1/2" adhere to card front using Clear Double Sided Adhesive .   Using largest ' die cut patterned paper (5-1/4" square) ( ModaScrap - Wood Effects used here).  Adhere to card front using Clear Double sided Adhesive . Step 2   Cut circle frame from white Soft Finish Cardstock using 2 largest ModaScrap Dashing Circle dies.  Lay dies onto cardstock on cutting plate lining them up evenly spaced put little removable tape to hold in place die cut.  Save the inner circle for another project adhere frame to card front ...

Courage

Image
Welcome My Crafty Friends!  Spring has arrived finally and I believe we are all happy about that at least I know I am. Sadly we are all touched by "Cancer" at some point in our lives some more than others.  I know my family and friends have been touched many times.  Today my card is for a friend that has just recently been diagnosed with breast cancer. Here is how I created my card. Step 1   Cut 2 Garden Notes Berry Branch from brown cardstock.  Using pink Nuvou crystal drops make berries on branches.   Do 1 side let dry then do back side and let dry.  I do both sides like Susan does but it is optional. Step 2   Form 6" X 6" card base from white cardstock.  Emboss card front with embossing folder of your choice. Step 3   From white Soft Finish Cardstock cut 3 Garden Notes Round Grapevine Wreaths .  Using Kids Choice Glue just dab around center area on back of wreath (no glue on the little branches) attach 1 wreath at a tim...

Birthday Lilacs

Image
Hello my crafty friends.  I don't know about you but I am so wanting spring to come but I know here in Maine we have a while to go so I am creating my own spring by making Susan Tierney-Cockburn's paper flowers.  My post today uses her new release Garden Notes Lilac 2 along with and her Garden Notes Ladder Fern from previous release.  I have also used ModaScrap's new release Romantic Bouquet.The " happy birthday " is from an older release of A Way With Words by Suzanne Cannon and all can be purchased from Elizabeth Craft Designs . Here is how the card was created. Step 1  Make card base by cutting white cardstock 6" X 12" score at 6" fold on score line. Step 2  Emboss card front using a large embossing folder. Step 3  Using white Soft Finish Cardstock with Clear Double Sided Adhesive on top die cut ModaScrap - Romantic Bouquet and A Way With Words happy birthday .  Also cut happy birthday from black cardstock  with Clear Double Sided Adhe...