Posts

Showing posts from March, 2020

Life is Tough

Image
Hello My Crafty Friends, First and foremost I want to take the time to say THANK YOU to everyone on the front lines doctors, nurses, janitors, food service, grocery store employees as well as the truck drivers etc.  I hope that those that can stay home do stay home so we can get this horrible virus under control. Today I have a card that I created for a dear friend that has just been diagnosed with breast cancer which is very scary in itself but during this pandemic it is scary ten fold. A couple of weeks ago Susan's "Live" on Susan's Garden Club Facebook page had the Bells of Ireland which was intriguing as it was combining different pieces from several die sets.  Here is how I created it. Step 1 form 6" X 6" card base ( tent fold or side fold whichever your preference). Step 2  Cut white Soft Finish Cardstock 5-3/4" square.  Using shape of your choice cut shape upper left side of cardstock. ( Tonic Mixed Edge Diamond Layering Basics Die Set used here)

Wreath With Hellebores

Image
Hello my crafty friends, Just wanted to share with you a card I did for a Christmas card challenge I am a member of on Facebook - Cardmaking Tips.  On Sunday we are given a theme then we create a Christmas card using that theme and post picture of it in album for that week.  At the end of the year you have your Christmas cards made and ready to send out. On my card I have used Susan's Garden Notes Evergreen Wreath #1221, Garden Notes Berry Spray 1481 with Nuvo Drops - Autumn Red for berries and Susan's Garden Club Helleoborus Wood grain embossing folder and Close To My Heart stamp set - Christmas Joy #C1520. Thanks for stopping by and until next time - Happy Crafting! Christine You only live once but if you live right once is enough! Unknown

Pussy Willow Tutorial

Image
Hello my crafty friends, Hope everyone is staying safe and healthy during these stressful times.  One plus with all this staying in is a chance for a lot of us to craft more.  Since here in Maine the pussy willows are blooming I of course  wanted to recreate them for my cards.  I have come up with my take on making them I do hope it is helpful.  I don't do videos but have taken pictures. Stems: Find a die for a stick that is fairly straight.  The ones I have cut were from ECD Toasted Marshmallow die set ( I happened to be using for another card so I cut extra branches) I cut some out of white and equal amount from brown cardstock.  Adhere white on top of brown (Note: you can cut both out of brown rather than color with markers)  Using a couple shades of brown alcohol markers color stems.  Lay stems right side down and using leaf tool draw a line down middle then pinch between fingers to curve stem a bit. Buds: Mix Art Glitter Dries Clear glue mixing in s small dish with small amoun

Potted Orchid

Image
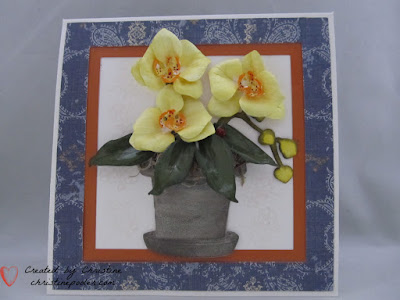
  Hello my crafty friends! Today I have a card I created per request of a friend.  Susan's Garden Notes Phalaenopsis (Moth Orchid) is the flower in Susan's Garden Notes Potted was used along with Fitted Stitch Frame It Square dies. Susan has a video on her Facebook page Susan's Garden Club for the orchid. You can find video here  6" X 6"  bright white card blank. Patterned paper cut to 5-3/4" X 5-3/4" die cut square in center. Burnt Orange cardstock cut 5-1/2" X 5-1/2" next smaller square cut in center.  Using clear double sided adhesive attach patterned paper over orange cardstock lining up so it is even all around then adhere to card front using clear double sided adhesive. Cut 2 pots from cardstock with clear double sided adhesive on back - 1 from gray card stock 1 from white soft finish cardstock. Adhere white on top of gray one.  Using alcohol markers color and shade.  Remove protective backing add couple of dimension squares lower center

Cheery Pom Pom Dahlias

Image
  Welcome my crafty friends, Today I have a colorful card that could be used for several different occasions.  Once again I had seen a picture posted on Facebook that inspired me to make some of Susan's Pom Pom Dahlias.   Look around there are so many places to find inspiration for a card.  Here is the inspiration picture. Here is how I created my card. Card base 6" X 6" - Craft Perfect White Card Base used here. Cut colored cardstock 5-3/4" square attach to card front using Clear Double Sided Adhesive. Cut White Soft Finish Cardstock 5-1/2" square attach to card front using Clear Double Sided Adhesive. Spellbinders Grand Decorative Ovals - smallest was used to cut a decorative oval from white Soft Finish Cardstock. Create background piece 3-1/2" X 4" die cut using oval that will fit inside decorative oval then adhere in center using Clear Double Sided Adhesive.  My background piece was photo paper then colored with Brusho Powders. Vase was cut on Cr

Family Hydrangeas

Image
Hello My Crafty Friends, Today I have another card for you that I created,  my inspiration actually being bouquet of dried hydrangeas that sits on my dresser in an old antique vase.  The hydrangeas are ones that grow across the front of my house they are called Bobo.  These hydrangeas have been on my dresser since I cut them last fall and one day as I looked at them my inspiration hit me. Inspiration: Here is how it was created. Step 1   Card base is 5" X 7 - I used Tonic Studios Craft Perfect Ivory White Card Blanks.  These card blanks are very nice quality also com in white and other sizes. Step 2   Cut colored cardstock 4-3/4" X 6-3/4" using Oval die set ( Susan's Garden Notes Fitted Frame It used here) choose oval one size smaller than what you want for opening - die cut oval in cardstock keeping it close to top.    Cut Ivory cardstock 4-1/2" X 6-1/2"  Using next size up oval die cut oval adhere ivory on top of colored using Clear Double Sided Adhesi

Bachelor Buttons Hello

Image
Hello My Crafty Friends, Wow March 1st spring is around the corner at least I hope it is. Today I have a card for you it was inspired by a picture that I saw on Facebook.  This is the picture.  After Susan did these on her "Live" a couple weeks ago I decided it was time to make my card. Here is how my card was created. Step 1   Create 6" X 6" card base from white Cardstock  or use purchased one which you can find at Tonic Studios.  Cut colored cardstock (light green used here) 5-1/2" X 5-1/2" adhere to card front using Clear Double Sided Adhesive .  Cut white cardstock 5-1/2" X 5-1/2" emboss using embossing folder of your choice. ( Craftwell Delicate Dots used here) then adhere to card front using Clear Double Sided Adhesive . Step 2   Using Tonic Studios Verso Classic Quatrafoil die (2 pieces together) cut white cardstock.  Using white cardstock slightly larger than the Quatrafoil.  Using 2 colors of Nouvo Embellishment Mousse (Spring Green an