Posts

Showing posts with the label Canning Jar

Poppy Hugs

Image
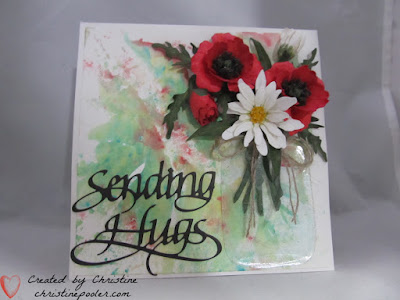
Hello My Crafty Friends, I do hope you are all staying safe and healthy.  We are staying home as much as possible only going to grocery store as needed.   Boy I cannot wait until hubby can take this job back I am not a fan of grocery shopping.  We are both in that bracket of being higher risk due to health and age he is 78 and I am 70.   Let 's hope that this is all over soon so we can get back to some kind of normalcy. During my time at home I have been making some flowers and creating cards.  Today's card is featuring the poppy and daisy.  Perfect timing on my part as I see Susan is doing a live today and one of the things she is demonstrating is the poppy so I will link that as soon as it is available.  Susan's link came be found here for both the poppy and daisy. Sadly I have several sympathy cards to make none being due to the virus thank goodness. Exciting news from Susan Tierney-Cockburn she is going with Spellbinders and will have a ...

Pussy Willows & Daffodils

Image
Hello My Crafty Friends, Hope that everyone is staying safe and healthy. Today I have a sympathy card I made for a friend - always hard card to make. My card was created using Susan's Garden Notes Canning Jar & Lid, Garden Notes Daffodil / Narcissus along with Garden Notes Stitched Frame It- Squares. Here is how it was created. Step 1  Card base is 6" X 6" white cardstock Step 2  Create a background piece.  Mine was created using  several colors of Nuvo Embellishment Mousse. Step 3  Using a coordinating cardstock to cut a frame using Susan's Garden Notes Stitched Frame It Squares (use two largest together to cut frame).  Using Clear Double Sided Adhesive attach frame over background piece.  Adhere the piece to card front using Clear Double Sided Adhesive. Step 4  Cut Susan's Garden Note Canning Jar twice once from white cardstock that has Clear Double Sided Adhesive on back and one from Clear Sticker Paper.  Adhere the clear jar on top of...

Spring Blossoms

Image
Welcome My Crafty Friends, Here in Maine it is still snowy and very cold I for one am dreaming of Spring and warmer days that bring spring flowers,  I see all these pictures of flowers on Facebook which has inspired my card today.   Here is my inspiration picture for my card. Here is how I created my card. Step 1   Form 6X6  card base from white Soft Finish Cardstock .  Cut 5-3/4 X 5-3/4 patterned paper ( Through the Lens - Woods used here) adhere to card front using Clear Double Sided Adhesive . Step 2 From Clear Sticker Paper cut 2 canning jars using Susan's Garden Canning Jar & Lid set.  Using blue alcohol marker color front of one jar adhere second jar on top of colored. Step 3   Create flowers approximately 15 cutting from 85# white Soft Finish Cardstock using Garden Notes Flowering Trees ( Susan Garden Cherry Blossoms actually used here but is sold out).  Cut 1 of the 3 petal and 2 of the 2 petal for each flower along with 1...

Sunflower Hugs

Image
Welcome my crafty friends! Today I have a card I created using Susan's Garden Notes Canning Jar & Lid, Garden Notes Sunflower 2, Garden Notes Lavender along with Suzanne Cannon's Sending Hugs Kisses die set.  ModaScrap - Wood Series patterned paper was also used. Here is how card was created. Step 1   Form 6" X 6" card base. Step 2   Cut ModaScrap -  Wood pattern paper 5-3/4" square.  Adhere to card front using Clear Double Sided Adhesive . Step 3   Using Garden Notes Lavender die set cut 1 stem from green cardstock shade with Distress Ink.  Cut plate of florets 10-16 times from yellow cardstock.  Place right side up on hard rubber pad / art eraser using toothpick cup each floret.  Using Kids Choice Glue attach florets to stem base forming Goldenrod. Step 4   Die cut Garden Notes Canning Jar twice from clear sticker paper.  Using Copic Markers color 1 jar first using Y13 color whole thing.  Then use E39 color leav...

Forget-Me-Not

Image
Welcome My Crafty Friends! My post today is a card using a couple of  Susan's new releases Garden Notes - Forget- Me- Not and Garden Notes Frame It - Ovals .  By now you can see I love the new Frame It Ovals there is also Circles, Squares and Rectangles in this new release as well. Here is how it was created. Step 1   Create 6" X 6" card base from white cardstock. Step 2   Cut patterned paper 6" X 6" adhere to  card front using Clear Double Sided Adhesive . Step 3   Cut white Soft Finish Cardstock 6" X 6" using next to largest Susan's Garden Notes - Frame It - Ovals . Place die 3/4" in from left side and equally between top and bottom - you want to leave room on right to stamp sentiment die cut oval.  Stamp sentiment  (you want to stamp before adhere just to make sure you get good image)using black ink.  (Stamp I used here was one of Susan's original Seeds of Thought Red Rubber Stamps at Elizabeth Craft Designs but I could not find it...