Posts

Showing posts with the label Tulips

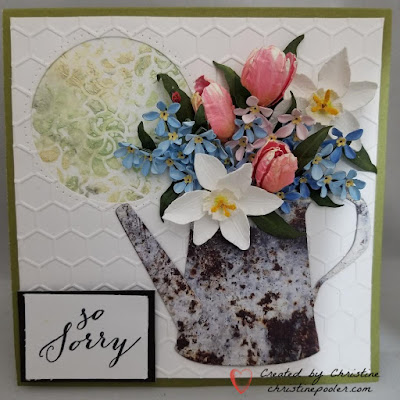
So Sorry Bouquet

Image
Hello My Crafty Friends, Sadly this week Corona 19 Virus took the life of a family member of one of our members of our online  paper garden club so members are making sympathy cards and posting them in our group - this is mine. For my card I have used Susan's Garden Notes Watering Can, Tulips, Forget Me Notes and Daffodil / Narcissus die sets as well as Frame It - Circles. Card base is 6" X 6" created from green cardstock.  White cardstock was cut 5-3/4" square then circle was cut in upper left corner.  Piece was then embossed.  Background piece was attached behind circle opening then piece was attached to card front using Clear Double Sided Adhesive. Watering Can was cut twice once from black cardstock with Clear Double Sided Adhesive on back and once from decorative paper also with Clear Double Sided Adhesive on back then adhered together.  Dimensional dots added to back in center then add to card front. Flowers were all cut from White Soft Finish Cardstock 90...

Pitcher of Tulips

Image
    Hello my crafty friends, Today I have a card I created using Susan's Garden Notes Tulip 2 and her Pottery Pitcher.  Once again I had seen a picture on Facebook and wanted to try to recreate in paper - something I really love to do.  Here is my inspiration picture. This is a 6" X 6" card base.  Tonic Specialty paper (white) was cut 6" square then oval was cut out of center.  Adhere to card front using Clear Double Sided Adhesive.  A second piece of Specialty paper (black) was used and same oval was cut from it.    Adhere the black oval inside oval opening on card front. The Pitcher was cut twice from black cardstock with Clear Double Sided Adhesive on back.  Adhere one on top of other.  The finish was actually a trial and error and it was not exactly how I wanted it but felt it was good enough to use.  I was out of texture paste so I used snow accent which is   grainier than texture paste.  I then used Seth Ap...

Bucket of Tulips

Image
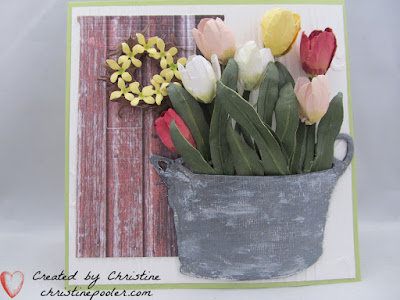
Hello My Crafty Friends, Hope everyone is doing OK during these trying times.  If the Corona Virus isn't bad enough we in Maine got slammed with a spring "Nor'Easter which left thousands of people without power over several days our home being one of them after 44 hrs without power it has been restored to us others are still waiting unfortunately - 2020 has been very interesting so far lets hope that it improves very soon.  Cudos to all the linemen and women out there helping to get power restored they work long hours in some difficult conditions. Today I have a card for you which I created using Susan's Garden Galvanized Bucket and her Garden Notes Tulip 2 dies along with a couple others. Here is how I created it. Step 1  Created 6" X 6" card base from green cardstock Step 2  Cut white cardstock 5-3/4" square then embossed using an 8-1/2 X 11 woodgrain embossing folder.  Adhere to card front using Clear Double Sided Adhesive. Step 3  Cut Garden Notes ...

Tulips in Pitcher

Image
    Welcome my crafty friends! Here is a little breath of spring as you know "Spring Always Comes" just not soon enough for some of us that are in the depths of very cold snowy winter. Today I have for you a card I have created for my niece's birthday.  I have used Susan's Garden Notes Pottery Pitcher, Tulips 2 along with ModaScrap's Wood Effect paper. Here is how it was created. Step 1   Using Garden Notes Pottery Pitcher cut 2 from white Soft Finish Cardstock which has Clear Double Sided Adhesive on the back.  Cut small star from same cardstock.  Place star on top of 1 pitcher then adhere second pitcher over first pitcher.  Using small ball tool rub around edges to outline star.  Using alcohol markers color pitcher (Copics E55 and E84 plus black to color star) color pitcher.  Lay face down into clear Versamark ink press in to cover coat with clear embossing powder then heat to set. Step 2    Create 9 tulips using Garden Note...

Tulips

Image
Hello my crafty friends! Today my post is a card I designed using a picture from Facebook as my inspiration and a little hope that we shall see tulips coming up here in Maine soon even though as I am looking out my window it is snowing hard. Here is how the card was made. Step 1   - Card Base is 6" X 6".  Cut dark chocolate Soft Finish Cardstock 6" X 12" score at 6" fold on score line.  Cut white Soft Finish Cardstock 5-1/2" X 5-1/2" adhere to card front using Clear Double Sided Adhesive .   Using largest ' die cut patterned paper (5-1/4" square) ( ModaScrap - Wood Effects used here).  Adhere to card front using Clear Double sided Adhesive . Step 2   Cut circle frame from white Soft Finish Cardstock using 2 largest ModaScrap Dashing Circle dies.  Lay dies onto cardstock on cutting plate lining them up evenly spaced put little removable tape to hold in place die cut.  Save the inner circle for another project adhere frame to card front ...

Courage

Image
Welcome My Crafty Friends!  Spring has arrived finally and I believe we are all happy about that at least I know I am. Sadly we are all touched by "Cancer" at some point in our lives some more than others.  I know my family and friends have been touched many times.  Today my card is for a friend that has just recently been diagnosed with breast cancer. Here is how I created my card. Step 1   Cut 2 Garden Notes Berry Branch from brown cardstock.  Using pink Nuvou crystal drops make berries on branches.   Do 1 side let dry then do back side and let dry.  I do both sides like Susan does but it is optional. Step 2   Form 6" X 6" card base from white cardstock.  Emboss card front with embossing folder of your choice. Step 3   From white Soft Finish Cardstock cut 3 Garden Notes Round Grapevine Wreaths .  Using Kids Choice Glue just dab around center area on back of wreath (no glue on the little branches) attach 1 wreath at a tim...

Love Fairy

Image
This card was designed for Susan's Garden Design Team at Elizabeth Craft Designs.  Susan's brand new Garden Notes Fairy - Rose Petal is featured on my card.  Be sure to go to Elizabeth Craft Designs Blog for a full tutorial for this card. Save