Posts

Showing posts with the label Frame It - Circles

Forget Me Not

Image
Hello My Crafty Friends, Trying to stay busy during the stay at home and no power days I have created another card.  I leave the sentiment off now until I am ready to use the card something that took me a long time to do.  I tend to make cards that can be used for most any occasion so by leaving the sentiment off until I need a card it is very easy to add sentiment. Here is how it was created. Step 1  Created 6" X 6" card base from white cardstock. Step 2  Cut piece of white cardstock 5-3/4" square  cut circle in upper left corner using Garden Notes Frame It Stitched Circle Dies then embossed using 8-1/2 x 11 honeycomb embossing folder. Step 3  Background piece was something I took from my stash I had created using Distress Oxide either inks or sprays.  Used a larger circle to cut to fit behind opening.  Used Clear Double Sided Adhesive to attach background circle to back of opening then attaching square to card front. Step 4  Susan's Garden ...
Cup of Forget Me Nots

Image
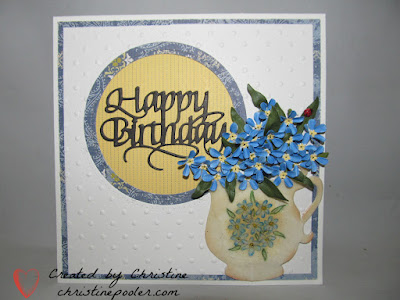
Hello My Crafty Friends, My card today features some of Susan Tierney-Cockburn' s older dies Garden Notes Tea Cup, Forget Me Nots and Stitched Frames Circle. This card was based on this inspiration picture Tea Cup was cut from White Soft Finish Cardstock with Clear Double Sided Tape on back. Adhere 1 on top of the other. Using Distress Oxide Inks I created a small background in center of cup. A few Forget Me Not flowers and leaves were penciled on over background. Water Color Pencils were used to color image. Several coats of embossing powder were added to cup. Garden Notes Forget Me Nots were created from White Soft Finish Cardstock colored with Copics B23 marker. The tiny center flowers were cut from yellow cardstock and leaves from green cardstock which was shaded and shaped. Several sprigs were created. Card base is a 6" X 6" created from White Soft Finish Cardstock. Yellow paper was cut 5-1/2" square adhered to card front. Blue printed paper was cut 5...

More Sympathy Cards

Image
  Welcome my crafty friends, It has been a long time since I posted and I am sorry but it just has been a crazy summer.  I do hope that you are all enjoying your summer. I have worked on cards but just haven't taken the time to post and unfortunately these cards do not have tutorials but I have links to the products I used so you just have to click on the picture and it will take you to the site.  If you have questions on how I did something please message me and I will gladly respond. For those of you who don't know Susan's Garden has gone to Tonic Studios and she will have a new release of dies in September and she has asked me to be on her Design Team which I feel honored as well as excited and of course I accepted so be sure to keep checking back she has some great dies coming. Thank you for stopping by today and until next time Happy Crafting! Christine

Watering Can with Calendula

Image
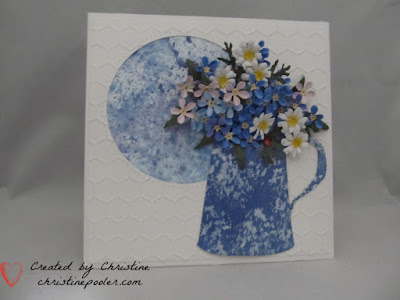
Welcome my crafty friends, Today I have created another card using Susan's new Garden Notes Watering Can and Garden Notes Calendula .  If you couldn't tell I love watering cans the picture in circle is actually part of my collection that I have. Here is how card was created. Step 1   Form 6" X 6" card base using white 110# Soft Finish Cardstock . Step 2  Cut white 90# Soft Finish Cardstock 5-3/4" square.  Using 6th largest die from Garden Notes Frame It - Stitched Circles cut circle in cardstock approximately 1/4" in from left side and 1/4" down from top. Step 3   Choose patterned paper, picture or use inks to make a back ground then cut using 7th largest circle die.  Using Clear Double Sided Adhesive adhere behind opening then adhere to card front. Step 4   Using black ink stamp sentiment to lower left corner of card. Step 5   Cut 2 Garden Notes Watering Can from cardstock with Clear Double Sided Adhesive on back - 1 gray 1 white.  ...

Glorious Sunflowers

Image
  Hello my crafty friends!  Welcome to my blog.  Today is a card I  created for the Elizabeth Craft Designs Design Team and is featured on the Elizabeth Craft Designs Blog .  Be sure to visit their blog where you will find a complete tutorial on how to create your own.  I do hope you enjoy it!  For any of Elizabeth Craft Designs products I used on this card just click on pictures below it will take you right to the item. Thanks for stopping by and until next time - Happy Crafting! Christine Elizabeth Craft Designs Supplies Other Supplies Cardstock - various shades of green, brown, white Clear Sticker Paper Nuvo Crystal Drops - Simply White & Mustard Yellow Copic Markers - various colors Distress Ink

Rhododendron Sympathy

Image
Welcome to my blog my crafty friends. Here is a card I designed for Elizabeth Craft Designs and posted on their blog at this link .  You will find a complete tutorial for this card.  My card showcases Susan's Garden Notes Rhododendron, Baby's Breath and her Stitched Frame It - Circles . For any of the Elizabeth Craft Designs supplies used in this project just click on any off the pictures and it will take you directly to their site. Elizabeth Craft Designs Supplies