Posts

Showing posts from April, 2020

Bottles of Blossoms

Image
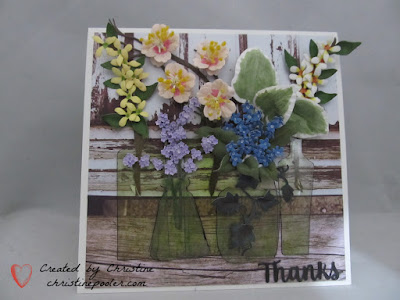
Hello My Crafty Friends, My card today was inspired by a picture that I had seen on Facebook.  This is my version using many of Susan's Garden Notes dies - Forsythia, Cherry Blossom, Lavender, Ivy Vine, Hosta Leaves etc. Card is 6" X 6" with 5-3/4" square patterned paper adhered to front using Clear Double Sided Adhesive. Bottles were first cut on the Cricut.  I couldn't get it to cut the sticker paperas I so I had to cut them from cardstock then trace onto clear sticker paper and hand cut.  Several different size bottles  were cut cutting several of each size.  A green alcohol marker was used to color one bottle then second bottle was adhered over top of colored one.  Used black alcohol marker to edge each bottle. Created Forsythia in white and yellow, Lavender, Cherry Blossoms, Brunnera, Hosta Leaves and Ivy Vine which was added to back of various bottles. Adhered bottles to card front adding Kids Choice Glue to adhere to flower branches and  leaves. Thanks was

So Very Sorry Daisy

Image
Hello My Crafty Friends, Another sympathy card today. Here is how it was created. Step 1  6 X 6 card base.  Cut colored card stock 5-3/4" square adhere to card front using Clear Double Sided Adhesive.  Cut white Soft Finish Cardstock 5" square emboss with an embossing folder.  Adhere to card front using Clear Double Sided Adhesive. Step 2  Cut 2 Ginger Jars from white Soft Finish Cardstock with Clear Double Sided Adhesive on back.  Adhere 1 on top of other.  Color using Alcohol Markers (Copic Sketch used here B28 and B29).  Add clear embossing powder to front cover with embossing powder heat set.  Add a couple pop dots lower center back adhere to card front. Step 3  Create 1 Shasta Daisy and 1 bud as well as leaves and stems cut from green cardstock.  Susan has a video for the daisy you can find it here Step 4  Add flowers to Ginger Jar using Kids Choice Glue. Step 5  Stamp sentiment on white Soft Finish Cardstock  with black ink.  Die cut using ECD Fitted Fishtail.  from bla

Blue Poppy & Daisies

Image
Hello My Crafty Friends, So happy that Susan is going with Spellbinders and that I am on her Design Team.  I will be linking more products once her new release comes out this September.  When you click on the linked items it takes you to the site where you can purchase you do not pay anymore this way but I do earn a small commision when you do this. Today I have another sympathy card I created once again using Susan's Garden Notes Poppy 2 and Shasta Daisy .  The background paper is a photo I had taken of some old peeling wallpaper then printed on white Soft Finish Cardstock. Here is how I created it. Step 1   6" x 6" card base.  Cut colored cardstock (black used here) 5-1/4" square adhere to card front using Clear Double Sided Adhesive .  Cut background paper 5" square add to card front using Clear Double Sided Adhesive . Step 2  Create 3 daisies, 2 buds and 1 poppy  Susan's video for these which can be found here Step 3   Build flowers on left side of ca

Poppy Hugs

Image
Hello My Crafty Friends, I do hope you are all staying safe and healthy.  We are staying home as much as possible only going to grocery store as needed.   Boy I cannot wait until hubby can take this job back I am not a fan of grocery shopping.  We are both in that bracket of being higher risk due to health and age he is 78 and I am 70.   Let 's hope that this is all over soon so we can get back to some kind of normalcy. During my time at home I have been making some flowers and creating cards.  Today's card is featuring the poppy and daisy.  Perfect timing on my part as I see Susan is doing a live today and one of the things she is demonstrating is the poppy so I will link that as soon as it is available.  Susan's link came be found here for both the poppy and daisy. Sadly I have several sympathy cards to make none being due to the virus thank goodness. Exciting news from Susan Tierney-Cockburn she is going with Spellbinders and will have a new release of dies and tools th

Ladybug Pop Up

Image
Hello My Crafty Friends, Here is a card I created for my sister's birthday - ladybugs are special to her as her middle daughter who has passed away loved them. I didn't do an actual tutorial I used Karen Burnistion's YouTube video for Surprise Ball Pop Up and made a ladybug.  This was not my idea Silvia Wirtz had posted one she had done and this is my version.  This Surprise Ball Pop Up die is so addicting so many possibilities out there just need your imagination. Thanks for stopping by and until next time - Happy Crafting! Christine You only live once but, if you live right once is enough!

Forget Me Not

Image
Hello My Crafty Friends, Trying to stay busy during the stay at home and no power days I have created another card.  I leave the sentiment off now until I am ready to use the card something that took me a long time to do.  I tend to make cards that can be used for most any occasion so by leaving the sentiment off until I need a card it is very easy to add sentiment. Here is how it was created. Step 1  Created 6" X 6" card base from white cardstock. Step 2  Cut piece of white cardstock 5-3/4" square  cut circle in upper left corner using Garden Notes Frame It Stitched Circle Dies then embossed using 8-1/2 x 11 honeycomb embossing folder. Step 3  Background piece was something I took from my stash I had created using Distress Oxide either inks or sprays.  Used a larger circle to cut to fit behind opening.  Used Clear Double Sided Adhesive to attach background circle to back of opening then attaching square to card front. Step 4  Susan's Garden Notes Watering can was us

Bucket of Tulips

Image
Hello My Crafty Friends, Hope everyone is doing OK during these trying times.  If the Corona Virus isn't bad enough we in Maine got slammed with a spring "Nor'Easter which left thousands of people without power over several days our home being one of them after 44 hrs without power it has been restored to us others are still waiting unfortunately - 2020 has been very interesting so far lets hope that it improves very soon.  Cudos to all the linemen and women out there helping to get power restored they work long hours in some difficult conditions. Today I have a card for you which I created using Susan's Garden Galvanized Bucket and her Garden Notes Tulip 2 dies along with a couple others. Here is how I created it. Step 1  Created 6" X 6" card base from green cardstock Step 2  Cut white cardstock 5-3/4" square then embossed using an 8-1/2 X 11 woodgrain embossing folder.  Adhere to card front using Clear Double Sided Adhesive. Step 3  Cut Garden Notes Fa

Pussy Willows & Daffodils

Image
Hello My Crafty Friends, Hope that everyone is staying safe and healthy. Today I have a sympathy card I made for a friend - always hard card to make. My card was created using Susan's Garden Notes Canning Jar & Lid, Garden Notes Daffodil / Narcissus along with Garden Notes Stitched Frame It- Squares. Here is how it was created. Step 1  Card base is 6" X 6" white cardstock Step 2  Create a background piece.  Mine was created using  several colors of Nuvo Embellishment Mousse. Step 3  Using a coordinating cardstock to cut a frame using Susan's Garden Notes Stitched Frame It Squares (use two largest together to cut frame).  Using Clear Double Sided Adhesive attach frame over background piece.  Adhere the piece to card front using Clear Double Sided Adhesive. Step 4  Cut Susan's Garden Note Canning Jar twice once from white cardstock that has Clear Double Sided Adhesive on back and one from Clear Sticker Paper.  Adhere the clear jar on top of white jar.  Using a D