Posts

Showing posts with the label Merry Christmas

Chestnuts Roasting On An Open Fire

Image
Hello my crafty friends! Today is another card that was a special order and it combines my 2 favorite die designers Susan Teirney-Cockburn for her realistic flowers and Karen Burniston for her fun and clever pop ups. My card is a slim line card 4" X 9" cut from 110# white cardstock.  Patterned paper was cut 3-3/4" X 8-3/4" adhered to card front using Clear Double Sided Adhesive. For inside of card I chose patterned paper to use as wall paper and flooring.  These were cut 3-3/4" X 8-3/4" and adhered t card using Clear Double Sided Adhesive.   The following Karen Burniston dies were used for Fireplace and accessories 1210 Fireplace Pop Up 1211 Fireplace Extras 1 1212 Fireplace Extras 2 To create the Fireplace I used Karen Burniston's YouTube video which you can find here . The Tree, Tree Skirt and berry garland were all from my stash then small adhesive backed gems were used to decorate tree. To light up candles and fire in fireplace I added Pear Blossom...

My Little Bucket Z Fold

Image
  Hello My Crafty Friends, Have been busy the last couple weeks and finally took the time to create a card for you.  My card today is a simple Z Fold card so simple but really looks elegant.  On Susan's Garden Club Facebook Live last week Susan has put out a challenge using her Wooden Bucket S6-182 from Summer Flora Collection and using flowers from one of the four seasons.  I have chosen to do Winter and fill it with winter greenery which is something I do for my home for Christmas Decorations. Card base is 6" X 6"  Cut 100# white cardstock 6" X 12" score at 3" and 6" fold on score lines 3" is mountain fold 6" is valley fold.  Pattern Paper was cut 2 pieces 2-3/4" X 5-3/4" (if using double sided paper you can flip second piece to back side to contrast on second 3" panel) and 1 piece 5-3/4" square adhered to card base using Clear Double Sided Adhesive .  The pattern paper I used was by Crafters Companion - Winter's T...

Christmas Pinwheel Tower Card

Image
Hello my crafty friends! Today's card is a Pinwheel Tower Card I created.  I saw onw of these cards on Facebook but I can't remember who posted the card as I always like to give credit to my inspiration.  This card is another fun and easy card to create.  The hardest part is of the whole card is deciding what you want to put on each side.  So many possibilities.  I did use Spellbinders Susan's Garden Hot Foil Tree and some White Pine branches both from newest release Winter Garden . Card base was created using YouTube video found here   Card is a slimline card 4" X 9" but she also gives measurements for other size cards. Patterned paper is once again P13 Winter Gatherings Each side was decorated differently using tags, sentiments etc. Front of card I used Spellbinders Susan's Garden White Pine from S5-515 Winter Evergreen Winter Garden Release.   The poinsettia was fussy cut from the patterned paper snow added and was added to card front using...

Merry Christmas Double Candle Oval

Image
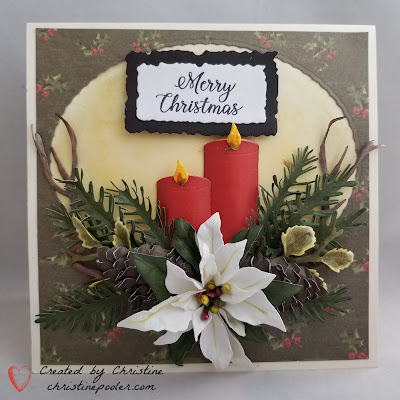
  Hello my crafty friends, Today I have another Christmas card that I created using Susan's new Holiday Flora Release .  I have used the Poinsettia, Pinecones & Evergreen Boughs, Winter Boughs & Evergreen Shrubs and candles from Garden Lantern. Card is 6" X 6"off white cardstock tent fold. Patterned paper was cut 5-3/4" square.  Using Oval die cut opening in patterned paper evenly lining up die so top and 2 sides have equal distance which leaves about 2 inches on bottom.  Laid on card front and lightly traces around oval removed pattern piece and used distress inks to create a back ground.  (Old Paper and Scattered Straw were used here)  Erased oval pencil mark then using Clear Double Sided Adhesive attached patterned paper to card front lining up oval opening over inked area. 4 candles were cut from red cardstock and stacked together attaching with Barely Art Glue creating 2 candles.  1 candle was cut shorter and a small slit was made in top...

Wagon Full of Holly

Image
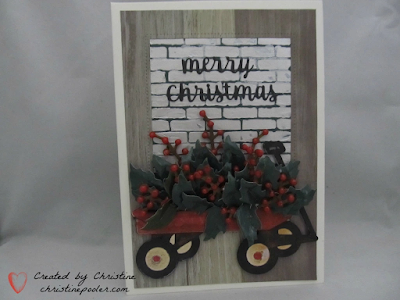
Hello my crafty friends, Wow Thanksgiving is next week and still need to get some Christmas cards done. Today my card is a simple card made using Susan's Garden Club Holly & Berry dies set from Tonic Studios and a little red wagon that has been laying around on my desk for quite some time now waiting to be used. it was cut on the Cricut. The bricks were made using a stencil I have had for a long time and Nuvo Expanding Mousse - Worn Linen . Step 1 cut several berry branches from brown cardstock. Using Nuvo Crystal Drops - Berry Red add berries to branches - set aside to dry. When berries are dry turn over and add berries to back side - let dry. Step 2 cut a bunch of holly using Susan's Garden Club Holly & Berries die set. I cut mine from green cardstock but Susan cuts her's from white cardstock and colors with alcohol markers which I will try next time. Shade and shape leaves. Using Nuvo Crystal Glaze Paint all the leaves then set aside to dry. Th...

Basket of Holly and Berries

Image
Welcome my crafty friends, Here today with another card I have had down for a while so not a lot of detail. Susan dies are available on Create & Craft for 1st 30 days then will be available from Tonic Studios so be patient they are coming. Today I have used Susan's Garden Gathering Basket (love that the die set comes with both the metal tub and the basket) along with her Holly and Berries. Another 6" X 6" card base from colored cardstock.  White cardstock cut 5-1/2" square then embossed. Basket cut from white cardstock twice adhere on top of each other then colored with alcohol markers adhered to card front. Made a bunch of Holly leaves and Berry Branches.  When berries are involved that is always my first step so that they will have time to dry completely while I am doing everything else.  Berries were done using Autumn Red Nuvo Drops on both sides as Susan does.  Holly cut from green cardstock then shaped and glazed.  Added to basket using Nuvo Dexluxe Adh...

Merry Christmas From Buster

Image
Welcome my crafty friends, Today I have another Spinner Square Pop Up card for you.  This card is so much fun I just can't help myself.  Funny thing is I bought this Karen Burniston Die Set to make an altogether different card which I have not made yet as I have been having so much fun making these cards.  I believe that this is going to be one of those dies I will get my money's worth out of it.  I did not do a tutorial as it would basically be same as the chicken card I previously posted.  Buster the dog is another old die of Karen Burniston's which has been discontinued but I am sure you can find another dog die.  Hope you enjoy this card. Thanks for stopping by today and until next time - Happy Crafting! Christine

October Challenge - A Very Krista Christmas!

Image
Welcome my crafty friends! Once again it is time for Elizabeth Craft Designs Team Designer Challenge .  Be sure to check out the Elizabeth Craft Designs Blog to see what all the designers have created for this challenge. Our challenge for October is A Merry Krista Christmas .  We are using stamps and coordinating dies from Krista Schneider 's new release for this challenge. The question of this month: Which of the new Krista Schneider stamp sets would you use to create a Christmas card. Here is how I created my card. Step 1   Form card base 4-1/4" X 5-1/2" card base using white Soft Finish Cardstock . Step 2   Cut white Soft Finish Cardstock 4" X 5-1/4" add Clear Double Sided Adhesive to top.  Remove protective covering a little at a time pouring Periwinkle Silk Microfine Glitter over exposed adhesive once covered with glitter tap off excess glitter polish with fingers. Step 3   Using curved die From Joset Designs Sliders and Spinners place cutting ...

August Challenge - Fun With Character Dies

Image
Hello, welcome to my blog. Today is a new challenge for Elizabeth Craft Designs Design Team .  This month the Design Team Challenge is Christmas Fun With Character Dies which is a brand new release by Joset Designs .  There are so many cute dies and I have chosen to use the Penguin and Igloo die sets.  Be sure to check out all the other Design Team creations on the Elizabeth Craft Designs Blog and at the same time answer the question for a chance to win. Here is how my card was made. Step 1   Form 6" X 6" gate fold card from white card stock by cutting cardstock 6" X 12" scoring at 3" from each end fold on score lines.  Note: by measuring in from each end your center comes together more evenly. Step 2   From white Soft Finish Cardstock cut 2 pieces each 2-3/4" X 5-3/4".  Using embossing folder of your choice (snowflakes used here) emboss pieces.  Adhere to card front using Clear Double Sided Adhesive . Step 3   From white Soft Finish C...