Posts

Showing posts with the label galvanized bucket

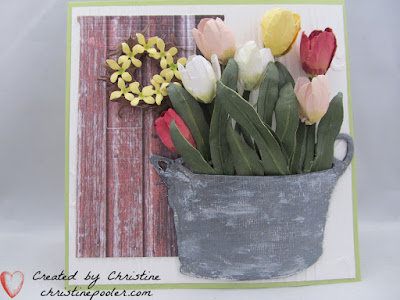
Bucket of Tulips

Image
Hello My Crafty Friends, Hope everyone is doing OK during these trying times.  If the Corona Virus isn't bad enough we in Maine got slammed with a spring "Nor'Easter which left thousands of people without power over several days our home being one of them after 44 hrs without power it has been restored to us others are still waiting unfortunately - 2020 has been very interesting so far lets hope that it improves very soon.  Cudos to all the linemen and women out there helping to get power restored they work long hours in some difficult conditions. Today I have a card for you which I created using Susan's Garden Galvanized Bucket and her Garden Notes Tulip 2 dies along with a couple others. Here is how I created it. Step 1  Created 6" X 6" card base from green cardstock Step 2  Cut white cardstock 5-3/4" square then embossed using an 8-1/2 X 11 woodgrain embossing folder.  Adhere to card front using Clear Double Sided Adhesive. Step 3  Cut Garden Notes ...
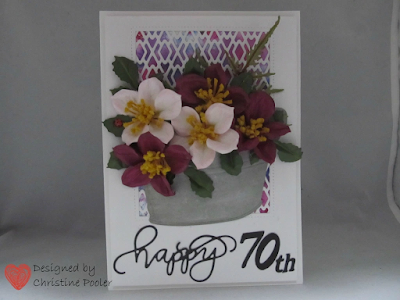
Lenten Rose 70th

Image
Hello my crafting friends, welcome to my blog! Today I have a card I created for a dear friend that has been my friend since childhood. Our birthdays are a week apart and we have been exchanging birthday cards for many years. My card was created using Susan's Garden Club Helleborous, Japanese Painted Fern, Galvanized Bucket, Tonic Studios - Patterned Panels - Deco Diamonds and Nuvo Shimmer Powders . Step 1 Using Craft Perfect Watercolor Paper and Nuvo Shimmer Powders in colors of your choice sprinkle powders onto watercolor paper lightly spritz with water continue until you like the results. Set aside to air dry. Cut to size of diamond panel. Step 2 From white cardstock die cut 1 Deco Diamond Panel . Step 3 Cut 1 piece of white cardstock 4-3/4" X 6-3/4" then using a rectangle die just a little smaller than the diamond panel cut rectangle in upper portion of cardstock. Step 4 Using Nuvo Deluxe Adhesive attach panel over the colored piece then center behind...

Happy Birthday Friend

Image
Welcome to my blog my friends, Today I am posting a birthday card that I made for a very special friend since grade school which is a very long time trust me hehehe.  Obviously being December 1st I have done a wintery card Here is how I created my card. Step 1  Cut 2 (1 with Clear Double Sided Adhesive on back and 1 without adhesive)  Garden Notes Berry Branch from brown cardstock.  Adhere 1 on top of other.  Add berries using Nuvo Crystal Drops Simply White.  Set aside to dry then repeat on the back. Step 2  Cut 2 Garden Notes Hawthorne from green cardstock and shade.  Using Nuvo Crystal Drops Autmun Red add berries set aide to dry then repeat for back side.  Susan has a good video which can be found here . Step 3  Form 6" X 6" card base. Cut brown cardstock 5-3/4" X 5-3/4" using 6th die in Garden Notes Frame It / Stitched Squares cut opening in upper left.  Cut patterned paper to fit opening ( ModaScrap Woods used here) ad...

Bucket of Daisies

Image
Welcome  My Crafty Friends, My post today is a card I designed for Elizabeth Craft Designs Blog using some of Susan's Garden Notes new releases.  I have chosen to use Garden Notes Fitted Frames - Ovals , Galvanized Bucket and Shasta Daisy along with older releases Ivy and Ostrich Fern .  You can find tutorial on their blog at this LINK . You can click on any of the icons below to review / purchase. Thanks for stopping by today - until next time - Happy Crafting! Christine Elizabeth Craft Designs Supplies

ECD Design Team Focus on New Release - Susan's Garden

Image
Today members of ECD Design Team are doing another focus day and today it is for Susan's Garden's new release which consists of 8 dies.  You are going to love them! For my card today I have chosen to use 3 of the new release Galvanized Bucket, Forsythia and Frosty Fern.  Sentiment is from Joset's Words 1 - Celebration set. Be sure to visit Elizabeth Craft Designs Blog to see what other team members have created with this new release for Susan's Garden. Here is how I created my card. Step 1   Using 3 Distress Oxide Reinkers (Peeled Paint, Fossilized Amber and Worn Lipstick used here) put 3 drops of of peeled paint, 3 drops of fossilized amber and 1 drop of worn lipstick onto non stick craft mat spritz with water take 5" X 8-1/4" white Soft Finish Cardstock spritz with water then tap into ink lift and tap again drying in between continue until piece is covered and to your liking.  Cut to 5" X 7" taking remaining piece add Clear Double Sided Adhesive ...