Posts

Showing posts with the label Suzanne Cannon

Poppy Hugs

Image
Hello My Crafty Friends, I do hope you are all staying safe and healthy.  We are staying home as much as possible only going to grocery store as needed.   Boy I cannot wait until hubby can take this job back I am not a fan of grocery shopping.  We are both in that bracket of being higher risk due to health and age he is 78 and I am 70.   Let 's hope that this is all over soon so we can get back to some kind of normalcy. During my time at home I have been making some flowers and creating cards.  Today's card is featuring the poppy and daisy.  Perfect timing on my part as I see Susan is doing a live today and one of the things she is demonstrating is the poppy so I will link that as soon as it is available.  Susan's link came be found here for both the poppy and daisy. Sadly I have several sympathy cards to make none being due to the virus thank goodness. Exciting news from Susan Tierney-Cockburn she is going with Spellbinders and will have a ...

Family Hydrangeas

Image
Hello My Crafty Friends, Today I have another card for you that I created,  my inspiration actually being bouquet of dried hydrangeas that sits on my dresser in an old antique vase.  The hydrangeas are ones that grow across the front of my house they are called Bobo.  These hydrangeas have been on my dresser since I cut them last fall and one day as I looked at them my inspiration hit me. Inspiration: Here is how it was created. Step 1   Card base is 5" X 7 - I used Tonic Studios Craft Perfect Ivory White Card Blanks.  These card blanks are very nice quality also com in white and other sizes. Step 2   Cut colored cardstock 4-3/4" X 6-3/4" using Oval die set ( Susan's Garden Notes Fitted Frame It used here) choose oval one size smaller than what you want for opening - die cut oval in cardstock keeping it close to top.    Cut Ivory cardstock 4-1/2" X 6-1/2"  Using next size up oval die cut oval adhere ivory on top of colored using Clear Doubl...

Lenten Rose 70th

Image
Hello my crafting friends, welcome to my blog! Today I have a card I created for a dear friend that has been my friend since childhood. Our birthdays are a week apart and we have been exchanging birthday cards for many years. My card was created using Susan's Garden Club Helleborous, Japanese Painted Fern, Galvanized Bucket, Tonic Studios - Patterned Panels - Deco Diamonds and Nuvo Shimmer Powders . Step 1 Using Craft Perfect Watercolor Paper and Nuvo Shimmer Powders in colors of your choice sprinkle powders onto watercolor paper lightly spritz with water continue until you like the results. Set aside to air dry. Cut to size of diamond panel. Step 2 From white cardstock die cut 1 Deco Diamond Panel . Step 3 Cut 1 piece of white cardstock 4-3/4" X 6-3/4" then using a rectangle die just a little smaller than the diamond panel cut rectangle in upper portion of cardstock. Step 4 Using Nuvo Deluxe Adhesive attach panel over the colored piece then center behind...

Basket of Holly and Berries

Image
Welcome my crafty friends, Here today with another card I have had down for a while so not a lot of detail. Susan dies are available on Create & Craft for 1st 30 days then will be available from Tonic Studios so be patient they are coming. Today I have used Susan's Garden Gathering Basket (love that the die set comes with both the metal tub and the basket) along with her Holly and Berries. Another 6" X 6" card base from colored cardstock.  White cardstock cut 5-1/2" square then embossed. Basket cut from white cardstock twice adhere on top of each other then colored with alcohol markers adhered to card front. Made a bunch of Holly leaves and Berry Branches.  When berries are involved that is always my first step so that they will have time to dry completely while I am doing everything else.  Berries were done using Autumn Red Nuvo Drops on both sides as Susan does.  Holly cut from green cardstock then shaped and glazed.  Added to basket using Nuvo Dexluxe Adh...

October Challenge - A Very Krista Christmas!

Image
Welcome my crafty friends! Once again it is time for Elizabeth Craft Designs Team Designer Challenge .  Be sure to check out the Elizabeth Craft Designs Blog to see what all the designers have created for this challenge. Our challenge for October is A Merry Krista Christmas .  We are using stamps and coordinating dies from Krista Schneider 's new release for this challenge. The question of this month: Which of the new Krista Schneider stamp sets would you use to create a Christmas card. Here is how I created my card. Step 1   Form card base 4-1/4" X 5-1/2" card base using white Soft Finish Cardstock . Step 2   Cut white Soft Finish Cardstock 4" X 5-1/4" add Clear Double Sided Adhesive to top.  Remove protective covering a little at a time pouring Periwinkle Silk Microfine Glitter over exposed adhesive once covered with glitter tap off excess glitter polish with fingers. Step 3   Using curved die From Joset Designs Sliders and Spinners place cutting ...

Candle of Rejoice

Image
Hi my crafty friends welcome to my blog! Today I have a simple card using a couple of Suzanne Cannon's new releases they are wonderful. Here is how the card was created. Step 1   Create 6" X 6" card base from red cardstock. Step 2   Cut white Soft Finish Cardstock 5-3/4" square.   Using Garden Notes Stitched Frame It - Ovals die set use next to largest to cut oval placing die approximately 1/2" down from top.  Emboss Step 3   Using largest die from Garden Notes Stitched Frame It - Ovals die cut oval from green mirror card.  Add Clear Double Sided Adhesive to top side of oval around very edge line up behind oval opening adhere. Step 5   Attach white square to card front using Clear Double Sided Adhesive . Step 6   Die cut Suzanne Cannon's new Flourished Candle from gold mirror card.  Die cut candle parts from white Soft Finish Cardstock that has Clear Double Sided Adhesive on top.  Remove protective covering add Cool Diamond...

Build A Snowman

Image
Welcome to my blog today!  Krista Schnieder has a new Christmas release at Elizabeth Craft Designs some very cute  clear stamps and coordinating dies.  My card today features the new set Christmas Kids . Here is how it was created. Step 1   Form 6" X 6" card base. Step 2   Cut white Soft Finish Cardstock 5-3/4" square.  Using 2nd smallest die from Susan's Garden Notes Stitched Frame It - Ovals cut oval approximately 1" down from the top.  Dry emboss. Step 3   Cut piece of patterned paper a little larger than opening (I just die cut a piece using next larger die). Step 4   Using small piece of white Soft Finish Cardstock with Clear Double Sided Adhesive on top fit it to sit inside of oval then tear top edge to give it snow bank effect.  Remove protective paper at Cool Diamond Microfine Glitter burnish in with finger. Step 5  Using Kids Choice Glue adhere snow to bottom of patterned paper then add glue all around the very ...

Sunflower Hugs

Image
Welcome my crafty friends! Today I have a card I created using Susan's Garden Notes Canning Jar & Lid, Garden Notes Sunflower 2, Garden Notes Lavender along with Suzanne Cannon's Sending Hugs Kisses die set.  ModaScrap - Wood Series patterned paper was also used. Here is how card was created. Step 1   Form 6" X 6" card base. Step 2   Cut ModaScrap -  Wood pattern paper 5-3/4" square.  Adhere to card front using Clear Double Sided Adhesive . Step 3   Using Garden Notes Lavender die set cut 1 stem from green cardstock shade with Distress Ink.  Cut plate of florets 10-16 times from yellow cardstock.  Place right side up on hard rubber pad / art eraser using toothpick cup each floret.  Using Kids Choice Glue attach florets to stem base forming Goldenrod. Step 4   Die cut Garden Notes Canning Jar twice from clear sticker paper.  Using Copic Markers color 1 jar first using Y13 color whole thing.  Then use E39 color leav...

Sept Challenge - Classic Christmas

Image
Once again it is time for our Elizabeth Craft Designs Team Designers Challenge .  Be sure to check out the Elizabeth Craft Designs blog today to see what all the designers have created for the challenge. Our challenge for September is - Classic Christmas . What Elizabeth Craft Designs die or stamp set would you select if making a Christmas card. For today's challenge Elizabeth Craft Designs is giving away a $20.00 Gift Card to use on their website.  There will be 3 lucky winners. To enter just leave a comment on Elizabeth Craft Designs Facebook Giveaway Blog Post or the Elizabeth Craft Designs Challenge post and tell us what Elizabeth Craft Designs die or stamp set would you select if making a Christmas card. 3 lucky winners will be selected in a random drawing.  Winners will be announced on Friday September 21st on Elizabeth Craft Designs blog and Facebook page.   Today I have made 2 cards both using some of Joset Designs newly released dies. Card 1 - Ornaments ...

Framed Bouquet

Image
Welcome my crafty friends! Today my post is a card I designed for Elizabeth Craft Designs Design Team.  This card is posted on Elizabeth Craft Designs Blog with a full tutorial. Elizabeth Craft Designs Supplies Other Supplies Cardstock - 2 shades of green Nuvo Crystal Drops - Rhubarb Crumble Copic Markers Embossing Folder - Wood Grain used here

Week 14 Christmas Card Challenge - Snowy Trees

Image
Hello my crafty friends! Well this is week 14 of a Christmas Card Challenge I am in with Card Making Tips group on Facebook.  With this post I am caught up with posting my cards so you will only see 1 Christmas card post from me a week for now.  This weeks challenge is Snowy Trees - not decorated.  Elizabeth Craft Designs had the perfect die set for this plus their new Happy Frame which I am loving. Here is a quick tutorial on how I made this card. Step 1   Using Becky Seddon's Reindeer Die Set cut 9 or 10 trees from dark green cardstock and 3 snow mounds from white cardstock.  Using a pallet knife add Snow Accents to snow mounds and trees set aside to dry.   Note: With this snow be careful on snow mounds to keep away from each end and the bottom  edge as the frame will not lay flat against card and adhere. Step 2    Using ModaScraps Happy Frame Die Set cut 4 pieces to make frame from navy cardstock.  Crease all fold lines us...

Tulips

Image
Hello my crafty friends! Today my post is a card I designed using a picture from Facebook as my inspiration and a little hope that we shall see tulips coming up here in Maine soon even though as I am looking out my window it is snowing hard. Here is how the card was made. Step 1   - Card Base is 6" X 6".  Cut dark chocolate Soft Finish Cardstock 6" X 12" score at 6" fold on score line.  Cut white Soft Finish Cardstock 5-1/2" X 5-1/2" adhere to card front using Clear Double Sided Adhesive .   Using largest ' die cut patterned paper (5-1/4" square) ( ModaScrap - Wood Effects used here).  Adhere to card front using Clear Double sided Adhesive . Step 2   Cut circle frame from white Soft Finish Cardstock using 2 largest ModaScrap Dashing Circle dies.  Lay dies onto cardstock on cutting plate lining them up evenly spaced put little removable tape to hold in place die cut.  Save the inner circle for another project adhere frame to card front ...

Courage

Image
Welcome My Crafty Friends!  Spring has arrived finally and I believe we are all happy about that at least I know I am. Sadly we are all touched by "Cancer" at some point in our lives some more than others.  I know my family and friends have been touched many times.  Today my card is for a friend that has just recently been diagnosed with breast cancer. Here is how I created my card. Step 1   Cut 2 Garden Notes Berry Branch from brown cardstock.  Using pink Nuvou crystal drops make berries on branches.   Do 1 side let dry then do back side and let dry.  I do both sides like Susan does but it is optional. Step 2   Form 6" X 6" card base from white cardstock.  Emboss card front with embossing folder of your choice. Step 3   From white Soft Finish Cardstock cut 3 Garden Notes Round Grapevine Wreaths .  Using Kids Choice Glue just dab around center area on back of wreath (no glue on the little branches) attach 1 wreath at a tim...

Birthday Lilacs

Image
Hello my crafty friends.  I don't know about you but I am so wanting spring to come but I know here in Maine we have a while to go so I am creating my own spring by making Susan Tierney-Cockburn's paper flowers.  My post today uses her new release Garden Notes Lilac 2 along with and her Garden Notes Ladder Fern from previous release.  I have also used ModaScrap's new release Romantic Bouquet.The " happy birthday " is from an older release of A Way With Words by Suzanne Cannon and all can be purchased from Elizabeth Craft Designs . Here is how the card was created. Step 1  Make card base by cutting white cardstock 6" X 12" score at 6" fold on score line. Step 2  Emboss card front using a large embossing folder. Step 3  Using white Soft Finish Cardstock with Clear Double Sided Adhesive on top die cut ModaScrap - Romantic Bouquet and A Way With Words happy birthday .  Also cut happy birthday from black cardstock  with Clear Double Sided Adhe...

DT Focus Joset

Image
Outside of card Welcome my crafty friends! Today  new releases for Joset Designs are now available at Elizabeth Craft Designs be sure to visit Elizabeth Craft Designs Blog to see what the design team has created with the new releases. My creation today is a 6 X 6 pop up card using new stamp set Color My Flowers which has an optional coordinating die set. Other Supplies Black Cardstock Copic Markers R59, RV52, Y19, Y13, YG 95, YG 99 Distress Inks - Pumice Stone, Hickory Smoke Metallic Rub Ons - Gold Nuvo Crystal Drops - Rhubarb Crumble

Framed Lilacs

Image
Hello welcome to my blog! Today's post is a card I designed focusing on Susan's new Lilac 2 and Leafy Berry Branch dies along with ModaScrap's  new Happy Frame.  They are all available now from Elizabeth Craft Designs.   The following supplies are linked directly to website just click on any of them.  Be sure to check out Elizabeth Craft Designs blog and all the great designs our Design Team has come up with using the new releases. Other Supplies Cardstock - Brown, green ( 2 shades) Nuvo Crystal Drops - Violet Galaxy Distress Oxide Inks - Wilted Violet & Seedless Preserves Distress Oxide Re-Inkers - Twisted Citron & Seedless Preserves Thanks for stopping by I do hope you enjoyed. Until next time - Happy Crafting! Christine    

Noel Pines

Image
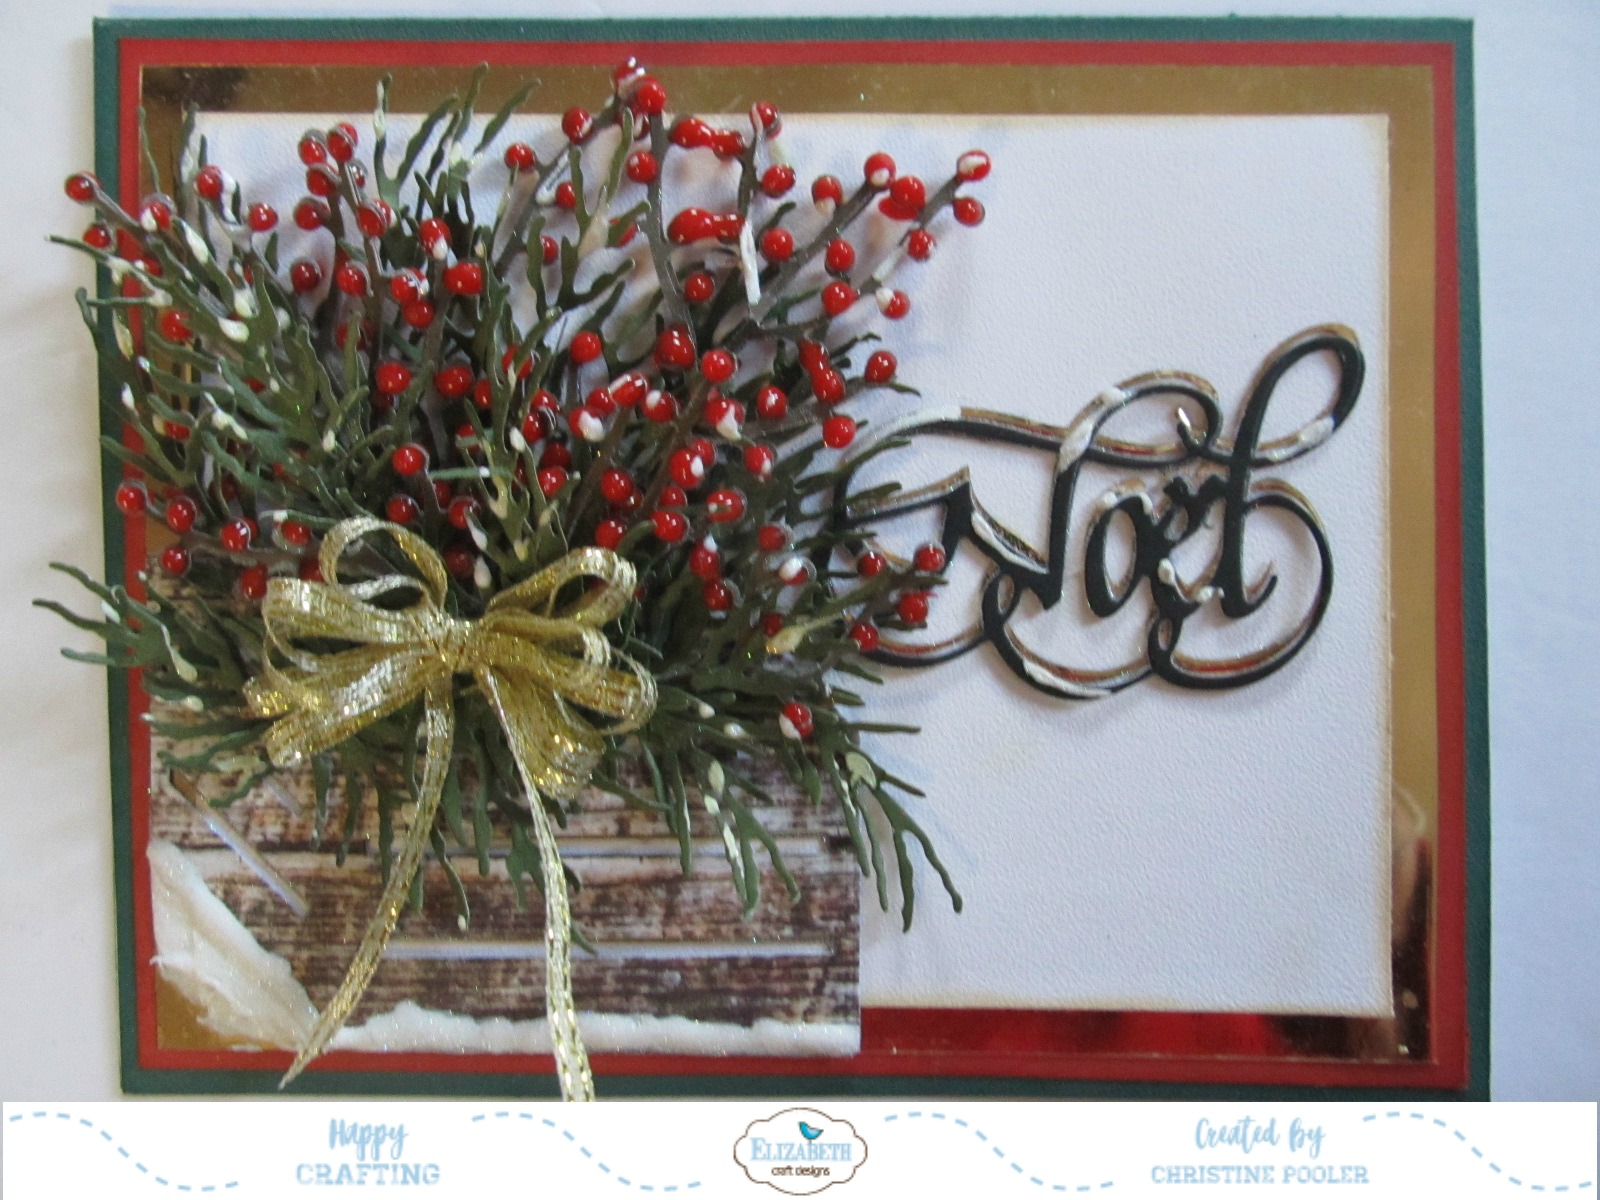
Welcome to my blog all you crafty friends - thanks for stopping by today. It is time again for another challenge for Susan's Garden Design Team and this month the challenge is to use red, green and gold in our design so I have chosen to do a Christmas card.    My card today is based on what I use for holiday decor around my house and I am a lover of rustic and primitive.  This wooden crate filled with pine boughs and red berry branches is what you would find adorning my deck. Be sure to visit Elizabeth Craft Designs to answer the question and enter your name for a chance to win! The question is  " What Susan Garden products would you like to find under your Christmas tree this year?”  http://blog.elizabethcraftdesigns.com/?p=28707      For today’s challenge Elizabeth Craft Designs  are giving away a  $20 Gift Card to use on the Elizabeth Craft Designs website   to 3 winners.  To enter simply answer the question o...

Sending Hugs

Image
Hello Everyone welcome to my blog. Today Susan's Garden Design Team has their very first challenge.  Our first challenge is to create a card / project that includes one or more of Susan's Garden flowers.  Susan Tiereny-Cockburn designs flower dies that are realistic and to scale as those flowers found in nature.  Be sure to visit Elizabeth Craft Designs blog to see all the great creations our design team has created. For today's challenge Elizabeth Craft Designs  are giving away a  Susan's Garden Prize Pack which includes: Garden Notes Square Window & Flower Box, Sunflower 2 and an All Metal Tool Kit  to 3 winners.  To enter simply leave a comment on the   Elizabeth Craft Designs Challenge post  and tell us " What  is your favorite flower from the Garden Notes collection ? ” We will select 3 lucky winners in a random drawing The winners will be announced on Friday, July 14 on the Elizabeth Craft Designs blog. For this challenge I h...

Baby Rose Card

Image
Hello to all my crafty friends out there!  I keep hoping for that spring weather to come and stay for a while but seems we get a couple of days of spring and then back into winter with cold temps and snow but then I have to stop and think we have nothing to complain about when you look at what so many in the southern states are going through I need to feel very very lucky!  My heart goes out to them for sure. Today I am posting a card that was made for my new great great niece.  Susan's Garden Notes Rose 2 was used along with Els van de Burgt Studio Stitched and Fitted Fishtail dies, Moda Scrap Dandelion Fluff dies and  Suzanne Cannon Baby Love die set. Although this card is my design the background of the card is not mine I cased it from Lauri Coons - Stampin Friends and I have told her that I had cased it.  She had posted a card on Facebook and I was intrigued so had to try it.  I chose colors to go with my card theme but the sky is the limit. Here...

Looking Through My Window

Image
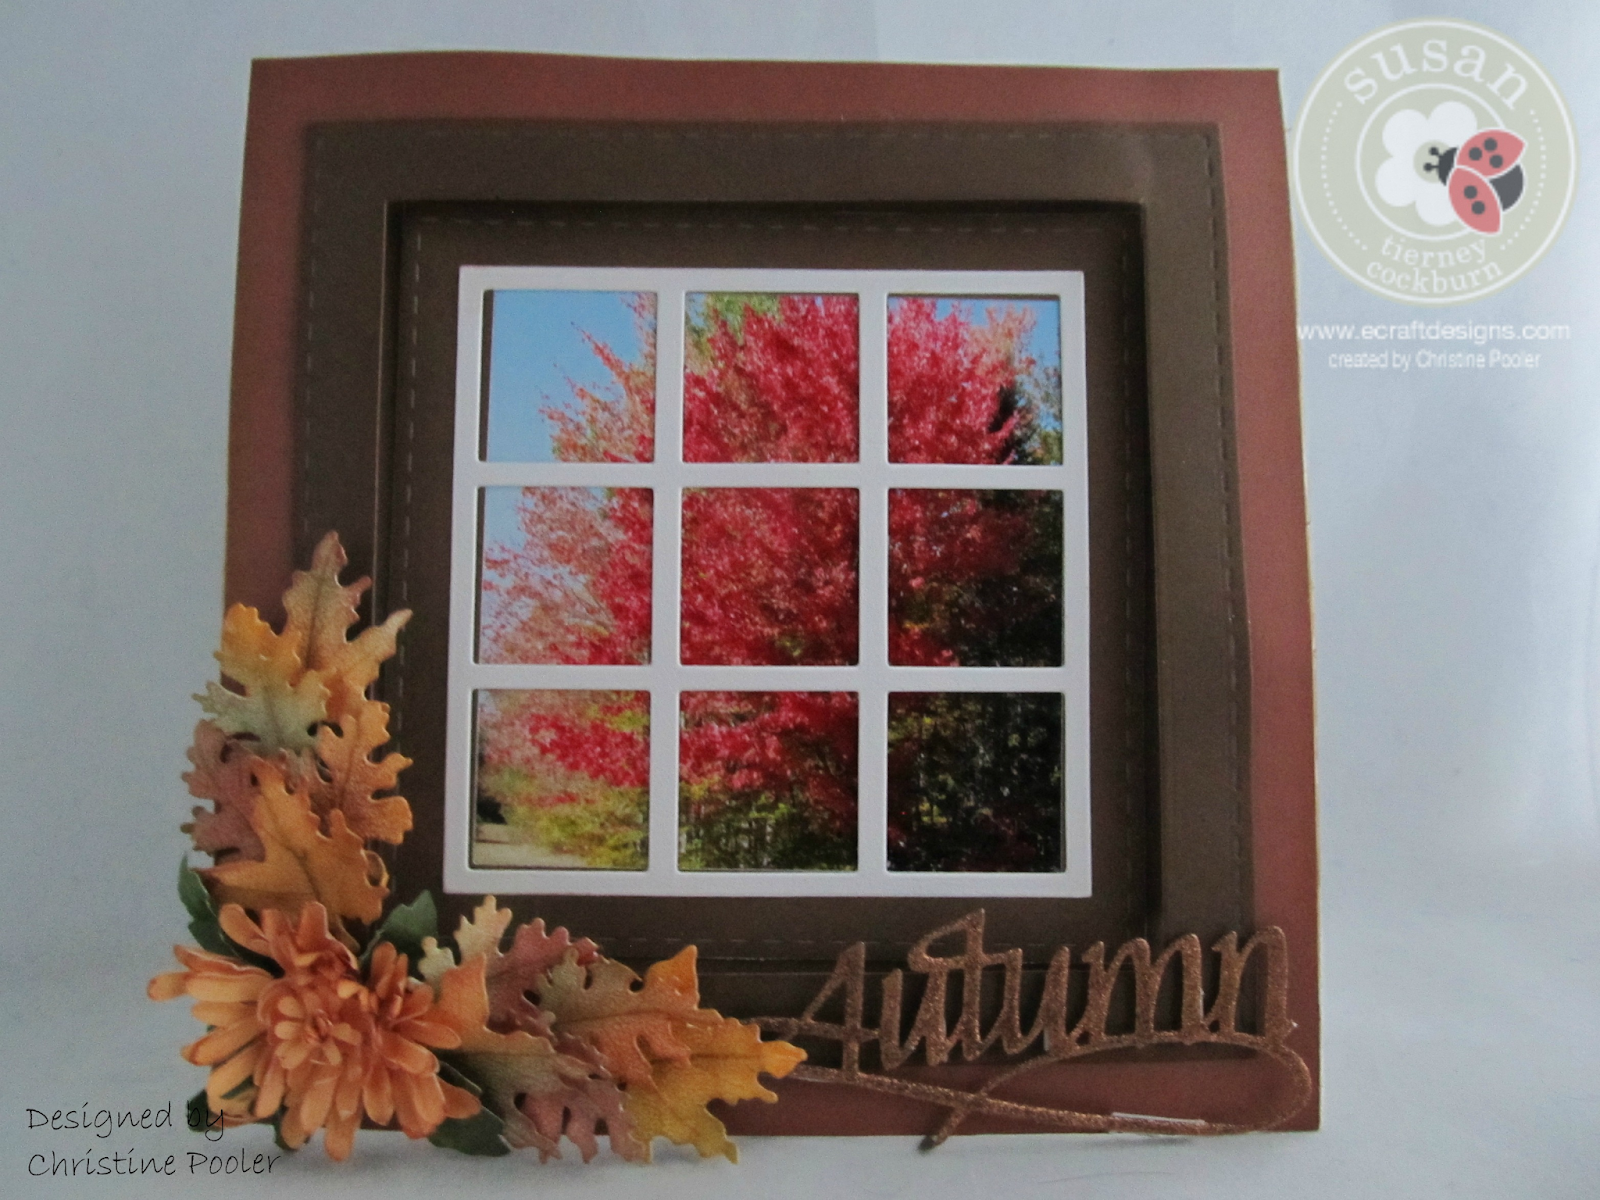
Hello everyone thanks for stopping by today.  Fall in Maine is absolutely gorgeous such colorful landscapes that we have had here in Maine this fall. My post today is a window card using an actual picture I took looking out my kitchen window.  What a pretty site to behold while washing dishes.  Using Susan's Garden - Garden Patch Woodland Leaves, Garden Notes - Chrysanthemum and Garden Patch 1" . Here is how I did it!  Cut white soft finish cardstock 6" X 12" score at 6" fold on score line this forms a 6'X6" card. Measure in 3/4" from edges all around card front making light pencil marks - drawn a square. Next measure in 1/4" from lines you just drew making light pencil marks and draw a square. Score on all lines. Cut a large X using an Exacto knife cutting on diagonal  outside corner to outside corner. Fold the outside score lines inward crease well then fold second set score lines towards center forming window. Cut 4-1/2...