Posts

Showing posts with the label Watering Can

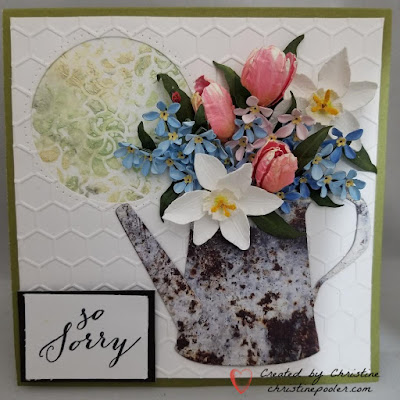
So Sorry Bouquet

Image
Hello My Crafty Friends, Sadly this week Corona 19 Virus took the life of a family member of one of our members of our online  paper garden club so members are making sympathy cards and posting them in our group - this is mine. For my card I have used Susan's Garden Notes Watering Can, Tulips, Forget Me Notes and Daffodil / Narcissus die sets as well as Frame It - Circles. Card base is 6" X 6" created from green cardstock.  White cardstock was cut 5-3/4" square then circle was cut in upper left corner.  Piece was then embossed.  Background piece was attached behind circle opening then piece was attached to card front using Clear Double Sided Adhesive. Watering Can was cut twice once from black cardstock with Clear Double Sided Adhesive on back and once from decorative paper also with Clear Double Sided Adhesive on back then adhered together.  Dimensional dots added to back in center then add to card front. Flowers were all cut from White Soft Finish Cardstock 90...
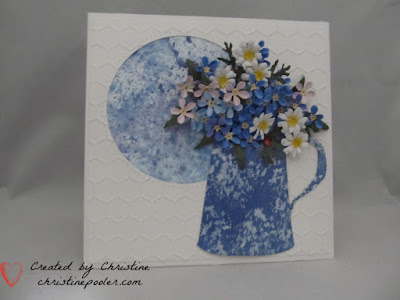
Forget Me Not

Image
Hello My Crafty Friends, Trying to stay busy during the stay at home and no power days I have created another card.  I leave the sentiment off now until I am ready to use the card something that took me a long time to do.  I tend to make cards that can be used for most any occasion so by leaving the sentiment off until I need a card it is very easy to add sentiment. Here is how it was created. Step 1  Created 6" X 6" card base from white cardstock. Step 2  Cut piece of white cardstock 5-3/4" square  cut circle in upper left corner using Garden Notes Frame It Stitched Circle Dies then embossed using 8-1/2 x 11 honeycomb embossing folder. Step 3  Background piece was something I took from my stash I had created using Distress Oxide either inks or sprays.  Used a larger circle to cut to fit behind opening.  Used Clear Double Sided Adhesive to attach background circle to back of opening then attaching square to card front. Step 4  Susan's Garden ...

Bachelor Buttons Hello

Image
Hello My Crafty Friends, Wow March 1st spring is around the corner at least I hope it is. Today I have a card for you it was inspired by a picture that I saw on Facebook.  This is the picture.  After Susan did these on her "Live" a couple weeks ago I decided it was time to make my card. Here is how my card was created. Step 1   Create 6" X 6" card base from white Cardstock  or use purchased one which you can find at Tonic Studios.  Cut colored cardstock (light green used here) 5-1/2" X 5-1/2" adhere to card front using Clear Double Sided Adhesive .  Cut white cardstock 5-1/2" X 5-1/2" emboss using embossing folder of your choice. ( Craftwell Delicate Dots used here) then adhere to card front using Clear Double Sided Adhesive . Step 2   Using Tonic Studios Verso Classic Quatrafoil die (2 pieces together) cut white cardstock.  Using white cardstock slightly larger than the Quatrafoil.  Using 2 colors of Nouvo Embellishment Mousse (Spring Gree...

Watering Can with Calendula

Image
Welcome my crafty friends, Today I have created another card using Susan's new Garden Notes Watering Can and Garden Notes Calendula .  If you couldn't tell I love watering cans the picture in circle is actually part of my collection that I have. Here is how card was created. Step 1   Form 6" X 6" card base using white 110# Soft Finish Cardstock . Step 2  Cut white 90# Soft Finish Cardstock 5-3/4" square.  Using 6th largest die from Garden Notes Frame It - Stitched Circles cut circle in cardstock approximately 1/4" in from left side and 1/4" down from top. Step 3   Choose patterned paper, picture or use inks to make a back ground then cut using 7th largest circle die.  Using Clear Double Sided Adhesive adhere behind opening then adhere to card front. Step 4   Using black ink stamp sentiment to lower left corner of card. Step 5   Cut 2 Garden Notes Watering Can from cardstock with Clear Double Sided Adhesive on back - 1 gray 1 white.  ...

Watering Can With Lupines

Image
Hello My Crafty Friends, Well the day is finally here for new release of Susan's Notes dies at Elizabeth Craft Designs and my card today and I am so excited to share with you my card using 2 of the new ones the Watering Can and the Lupine .  Was so excited over the watering can as I love the old ones and collect them. Here is how I created my card. Step 1   Create 5" X 7" card base from 110# white Soft Finish Cardstock .  Cut 85# white Soft Finish Cardstock 5" X 7" using next to largest Garden Notes Frame It - Stitched Oval cut oval in center.  Emboss  Add either patterned paper or a background you have made to card front using Clear Double Sided Adhesive making sure it is larger than the oval.  Adhere piece with oval cut out to card front. Step 2   From white Soft Finish Cardstock which has Clear Double Sided Adhesive on back cut 2 Garden Notes Watering Cans .  Adhere 1 on top of the other.  Using alcohol markers color can then add...