Posts

Showing posts with the label Joset Designs

Cheepers the Chicken Birthday Card

Image
Welcome My Crafty Friends, Today I have a card that I did for our granddaughter's birthday.  They have been raising chickens for a long time so I thought it would be fun to do a chicken card for her. My card uses Karen Burniston's Square Spinner Pop Up die set along with a couple of her discontinued dies Cheeper the Chicken and the Chicken Wire die.  Here is how I created the card. Step 1   Form card base from white Soft Finish Cardstock 4-1/4" X 5-1/2" Step 2   Cut 3 pcs. of patterned paper 4" X 5-1/4" ( ModaScrap - Wood Effects used here) .  Adhere 1 to card front ( NOTE : When and if you add patterned paper to the front you will need to run through machine several times with another piece of cardstock laid over it due to thickness) 1 to the right side inside card using Clear Double Sided Adhesive.  The third piece is to be adhered to left side just on left edge of card base so chicken wire can be added after cutting opening. Step 3   Die cut Chic...

Thank Ewe

Image
Welcome my crafty friends!  Happy New Year to all it has been a while since I posted anything so to start I wanted to share my thank you cards that I created .  No tutorial just wanted to share they are so easy. Thanks for stopping by I have a couple of posts that I am working on now just need to finish tutorials. Thank you for taking the time to stop by today! Until next time - Happy Crafting! Christine

Challenge - Garden Notes Frame It / Stitched Inspiration

Image
Hello my Crafty Friends welcome to my blog.  Today is a new challenge on Elizabeth Craft Designs Blog .  This month it is Garden Notes Frame It / Stitched Inspiration using Susan's garden Frame It Stitched dies.  I chose to use the squares along with Garden Notes Wheelbarrow and Windflowers.   Be sure to visit Elizabeth Craft Designs Blog to see all the great creations by all the design team members and of course answer the question  for a chance to win a gift card.  https://blog.elizabethcraftdesigns.com/2018/12/elizabeth-craft-designs-designer-challenge-december-2018/ .  The question this month is Which of the Garden Notes Frame It / Stitched die sets would you use on a project and how would you use it.   Here is how card was created. Step 1   Form 6" X 6" card base. Step 2   Cut patterned paper 6" X 6" ( ModaScrap Relax in the Garden used here) adhere to card front using Clear Double Sided Adhesive . Step 3   Cut 6" X 6" wh...

Heartfelt Hexagon

Image
Hello my crafty friends welcome to my blog! Today I have for you a sympathy card I created for a friend.  This card could be used for different occasions just by changing out the sentiment.  Dies I used are from Elizabeth Craft Designs - Susan's Garden Notes Helenium, Berry Spray, Baby's Breath along with Joset Designs Stitched Hexagon and Stitched Fishtail Banners . Here is how I created the card. Step 1   Cut 4 Garden Notes Berry Spray from brown cardstock  2 that have Clear Double Sided Adhesive on back and 2 without the adhesive.  Adhere 1 on top of other to form 2 sprays.  Using Nuvo Crystal Drops - Autumn Red add berries to spray set aside to dry then repeat for back side. Step 2   Cut Garden Notes Baby's Breath - stems from green cardstock and flowers from white Soft Finish Cardstock .  Shade, shape and create baby's breath.  Susan has some great videos on making her flowers on her Facebook page Susan's Garden Club. Step 3 ...

Happy Birthday Friend

Image
Welcome to my blog my friends, Today I am posting a birthday card that I made for a very special friend since grade school which is a very long time trust me hehehe.  Obviously being December 1st I have done a wintery card Here is how I created my card. Step 1  Cut 2 (1 with Clear Double Sided Adhesive on back and 1 without adhesive)  Garden Notes Berry Branch from brown cardstock.  Adhere 1 on top of other.  Add berries using Nuvo Crystal Drops Simply White.  Set aside to dry then repeat on the back. Step 2  Cut 2 Garden Notes Hawthorne from green cardstock and shade.  Using Nuvo Crystal Drops Autmun Red add berries set aide to dry then repeat for back side.  Susan has a good video which can be found here . Step 3  Form 6" X 6" card base. Cut brown cardstock 5-3/4" X 5-3/4" using 6th die in Garden Notes Frame It / Stitched Squares cut opening in upper left.  Cut patterned paper to fit opening ( ModaScrap Woods used here) ad...

Sept Challenge - Classic Christmas

Image
Once again it is time for our Elizabeth Craft Designs Team Designers Challenge .  Be sure to check out the Elizabeth Craft Designs blog today to see what all the designers have created for the challenge. Our challenge for September is - Classic Christmas . What Elizabeth Craft Designs die or stamp set would you select if making a Christmas card. For today's challenge Elizabeth Craft Designs is giving away a $20.00 Gift Card to use on their website.  There will be 3 lucky winners. To enter just leave a comment on Elizabeth Craft Designs Facebook Giveaway Blog Post or the Elizabeth Craft Designs Challenge post and tell us what Elizabeth Craft Designs die or stamp set would you select if making a Christmas card. 3 lucky winners will be selected in a random drawing.  Winners will be announced on Friday September 21st on Elizabeth Craft Designs blog and Facebook page.   Today I have made 2 cards both using some of Joset Designs newly released dies. Card 1 - Ornaments ...

Glorious Sunflowers

Image
  Hello my crafty friends!  Welcome to my blog.  Today is a card I  created for the Elizabeth Craft Designs Design Team and is featured on the Elizabeth Craft Designs Blog .  Be sure to visit their blog where you will find a complete tutorial on how to create your own.  I do hope you enjoy it!  For any of Elizabeth Craft Designs products I used on this card just click on pictures below it will take you right to the item. Thanks for stopping by and until next time - Happy Crafting! Christine Elizabeth Craft Designs Supplies Other Supplies Cardstock - various shades of green, brown, white Clear Sticker Paper Nuvo Crystal Drops - Simply White & Mustard Yellow Copic Markers - various colors Distress Ink

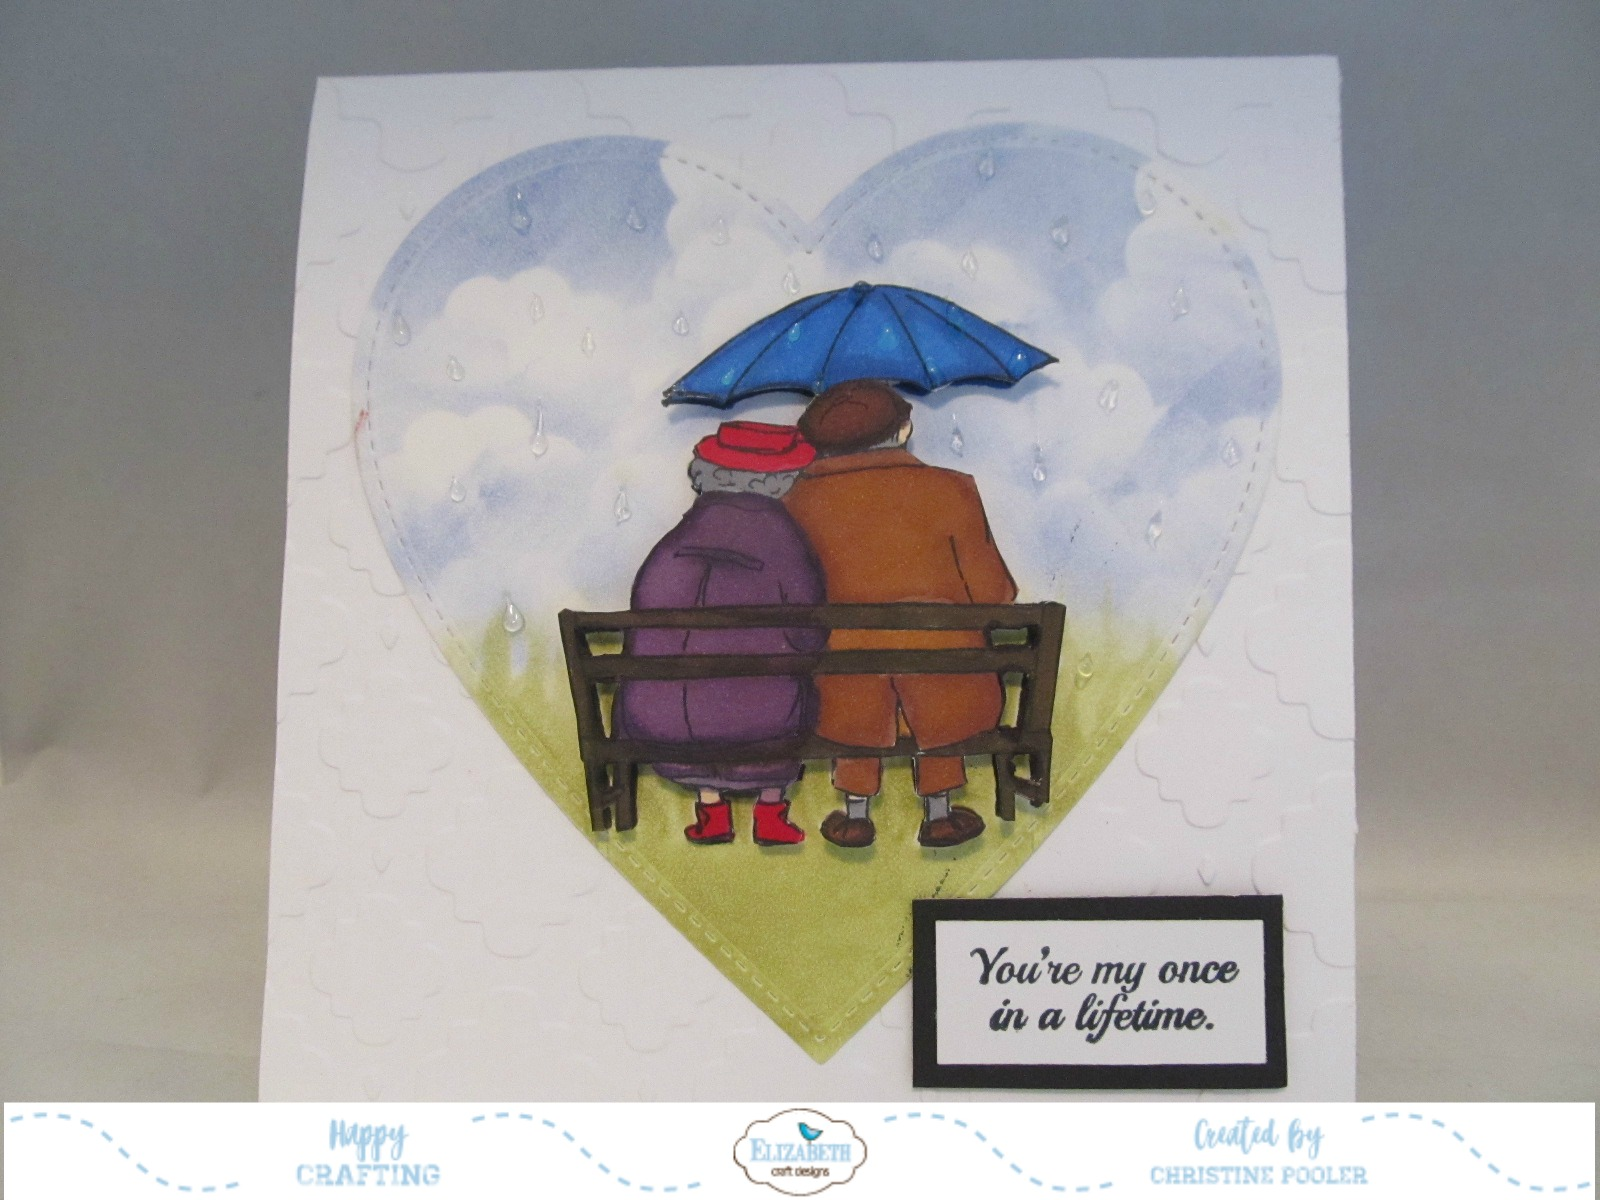
My Once In A Lifetime

Image
Hello my crafty friends welcome to my blog! Today I have an anniversary card which I made for my hubby to celebrate our 49th anniversary.   For this card I combined using dies as well as old school of stamping and fussy cutting for my main image. Here is how it was created. Step 1   From white Soft Finish Cardstock cut heart using Els van de Burgt Studio Stitched Hearts - 4th largest die.  Using Susan's Garden Notes Earth & Sky Stencil and PanPastels Set 2 blue for sky green for grass. Step 2   Using black ink stamped couple on bench twice onto white Soft Finish Cardstock .  Using alcohol markers color both images then fussy cut both.  Kids Choice Glue adhere 1 image to heart. Step 3   Using clear Nuvo Crystal Drops add raindrops to heart and umbrella of second image.  Set aside to dry. Step 4   Form 6" X 6" tent fold card base.  Emboss front of card with embossing folder of your choice. Step 5   For inside of card c...

Noel Poinsettias

Image
Welcome to my blog my crafty friends, Today's post is a card that I did fr Elizabeth Craft Designs Blog for a complete tutorial be sure to visit Elizabeth Craft Designs Blog .  All ECD products used for this project are listed below all you have to do is click on picture it will take you right to the item. Thanks for stopping by today and until next time - Happy Crafting! Christine Elizabeth Craft Designs Supplies Other Supplies Cardstock - black, green, white, brown Napkin Nuvo Drops - White Black Ink  

Life's A Picnic

Image
Welcome to my blog my crafty friends! Today on my blog I have a really quick and fun card.  Recently I was introduced to the Ultimate Glitter Napkin Technique.  Well once you start it is hard to stop you certainly look at napkins in a whole different way. For my card today I have used Joset Designs Backyard BBQ , Joset Designs Summer Fun Sentiments , ModaScrap Stitched Fishtail Banners and Garden Notes Stitched Fitted Frame It- Square sets. Here is how card was created. Step 1  Form 6' X 6" card base. Step 2   Cut True Green Soft Finish Cardstock 5-3/4" X 5-3/4". Using 6th largest die from Garden Note Stitched Fitted Frames - Squares lay on cardstock so it will cut a diamond shape die cut. Step 3  Napkin Technique:    Choose napkin of your choice separate the top printed layer from the other layer / layers (you can discard these).  Cut piece of white cardstock just slightly smaller than green cardstock.  Add Clear Double Sided Adhesive ...

Snowflakes

Image
Welcome my crafty friends! Today my post is a quick card I created using some of Joset Designs newly released dies Snowflakes , Snowflake Border and Words 5 Winter Wishes . Here is how the card was created. Step 1   Form 6" X 6" card base. Step 2   Cut 6" X 6" white Soft Finish Cardstock add Clear Double Sided Adhesive to top.  Add Silk Microfine Glitter - Sea Glass to adhesive burnish in with fingers. Step 3   Die cut bottom edge of card front using Joset Designs newest release Snowflake Border . Step 4   Using Joset Designs new release Snowflakes die cut 2 from white Soft Finish Cardstock that has Clear Double Sided Adhesive on front.  Add Silk Microfine Glitter - Cool Diamond to adhesive burnish in with fingers.  Adhere to card front using Kids Choice Glue on back center of each snowflake.  Add pearls to center of each snowflake.  (I use a bit of Kids Choice Glue to pearls even if they have adhesive on back because of the ...

August Challenge - Fun With Character Dies

Image
Hello, welcome to my blog. Today is a new challenge for Elizabeth Craft Designs Design Team .  This month the Design Team Challenge is Christmas Fun With Character Dies which is a brand new release by Joset Designs .  There are so many cute dies and I have chosen to use the Penguin and Igloo die sets.  Be sure to check out all the other Design Team creations on the Elizabeth Craft Designs Blog and at the same time answer the question for a chance to win. Here is how my card was made. Step 1   Form 6" X 6" gate fold card from white card stock by cutting cardstock 6" X 12" scoring at 3" from each end fold on score lines.  Note: by measuring in from each end your center comes together more evenly. Step 2   From white Soft Finish Cardstock cut 2 pieces each 2-3/4" X 5-3/4".  Using embossing folder of your choice (snowflakes used here) emboss pieces.  Adhere to card front using Clear Double Sided Adhesive . Step 3   From white Soft Finish C...

I Love You Beary Much

Image
  Hello My Crafty Friends - Welcome To My Blog! Today the ECD Design Team is doing a focus on Joset's new release that is now available it consists of 13 die sets and 2 sentiment stamp sets you will love them. Be sure to visit Elizabeth Craft Designs Blog   to see what all the other designers have created. Here is how my card was created. Step 1   Form a 6" X 6" card base from white cardstock. Step 2   Cut patterned paper just under 5-3/4" square. Step 3   Cut 2 pieces of white Soft Finish Cardstock 5-3/4" square.  Using 3rd largest Garden Notes Stitched Fitted Frames - Squares center on cardstock then die cut.  Save center square to use on another project.  Adhere patterned paper to back of fr a me using Clear Double Sided Adhesive then adhere to card front. Step 4   Using Joset's Polar Bear, Igloo and Toasted Marshmallows and white Soft Finish Cardstock cut out 2 bears, 2 sticks, 2 fish and fire with logs.  Using alcohol mark...

Happy 16th

Image
Hello My Crafty Friends Welcome to My Blog! On my blog today is a birthday card I created for our grandson - hard to believe he is 16 and his sister 18 time does fly.  My card was created using some of Joset's latest releases 4th of July, Blackboard Numbers along with her Stitched Stars, Words 1 - Celebrate and General Pop Ups .  I also used Susan's Garden Earth & Sky Stencil . Here is how card was created. Step 1   Form 6" X 6" card base.  Emboss card front with embossing folder of your choice I used stars. Step 2   Cut white Soft Finish Cardstock 5-3/4" X 11-1/2" score @ 5-3/4" fold on score line.  Using Susan's CountryScapes Earth Sky Stencil add clouds and grass with Distress Inks and sponge. Step 3   Use largest pop up die from Elizabeth Craft Designs General Pop Ups Die set to cut pop up in center fold.  Work pop up folds.   Add Clear Double Sided Adhesive to back staying away from the pop up areas.  Adhere to inside o...

July Designer Challenge

Image
    Hello My Crafty Friends Welcome to My Blog! Once again it is time for the ECD Designer Challenge.  The challenge this month is to use Joset's Blackboard Alphabet and/or Blackboard Numbers die sets.   The question for the $20.00 giveaway this month is  What Elizabeth Craft Designs die or stamp set would you use the Blackboard Alphabet or Blackboard Numbers die sets.   Be sure to visit Elizabeth Craft Designs Blog at this link to see all the creations our Design Team have created using these dies and to enter for a chance to win. Here is how my card was created: Step 1   Create card base 5" X 7". Step 2   Cut patterned paper / cardstock 4-3/4" X 6-3/4" .  Using #6 square die of Susan's new Stitched Frame It Squares die set cut square into the right side of the patterned paper.  Adhere paper to card front using Clear Double Sided Adhesive .  (Note: I number the back of my dies starting with smallest being #1) Step 3 ...

Rhododendron Sympathy

Image
Welcome to my blog my crafty friends. Here is a card I designed for Elizabeth Craft Designs and posted on their blog at this link .  You will find a complete tutorial for this card.  My card showcases Susan's Garden Notes Rhododendron, Baby's Breath and her Stitched Frame It - Circles . For any of the Elizabeth Craft Designs supplies used in this project just click on any off the pictures and it will take you directly to their site. Elizabeth Craft Designs Supplies  

Designer Hexagon Challenge

Image
Hello Everyone, Welcome to my blog.  Today is challenge day for the Elizabeth Craft Designs Design Team.  This month our challenge is Hexagon Inspiration this is the card I designed for the challenge.  Be sure to go to Elizabeth Craft Designs blog   at this LINK to see what the other Design Team members have created using Joset's newly released Stitched Hexagons and Fitted Hexagon dies.  While there, be sure to answer the question for a chance to win a $20.00 Gift Certificate to Elizabeth Craft Designs. The question for $20.00 giveaway this month is what is your favorite way to use Elizabeth Craft Designs Stitched Hexagons or Fitted Hexagons dies.  Winners will be announced Friday June 22, 2018. Here is how my card was created. Step 1   From green cardstock using Garden Notes Leafy Berry Branch cut 1 set.  Lay right side down on molding mat using medium ball tool rub backs of leaves to give a bit of dimension, turn over and run ball tool down...

ECD Design Team Focus on New Release - Susan's Garden

Image
Today members of ECD Design Team are doing another focus day and today it is for Susan's Garden's new release which consists of 8 dies.  You are going to love them! For my card today I have chosen to use 3 of the new release Galvanized Bucket, Forsythia and Frosty Fern.  Sentiment is from Joset's Words 1 - Celebration set. Be sure to visit Elizabeth Craft Designs Blog to see what other team members have created with this new release for Susan's Garden. Here is how I created my card. Step 1   Using 3 Distress Oxide Reinkers (Peeled Paint, Fossilized Amber and Worn Lipstick used here) put 3 drops of of peeled paint, 3 drops of fossilized amber and 1 drop of worn lipstick onto non stick craft mat spritz with water take 5" X 8-1/4" white Soft Finish Cardstock spritz with water then tap into ink lift and tap again drying in between continue until piece is covered and to your liking.  Cut to 5" X 7" taking remaining piece add Clear Double Sided Adhesive ...

ECD Glitter Challenge

Image
Hello My Crafty Friends, Once again it is time for another Design Team Challenge this month the challenge is All That Glitters challenging us to use one of the 3 new palettes of Silk Microfine Glitter just released.  The three palettes are Bloom (which I have used), Beach and Earth each has 5 colors. Be sure to go to Elizabeth Craft Designs Blog to see all the creations by our Design Team and enter for a chance to win.  For today's challenge Elizabeth Craft Designs are giving away a $20 Gift Card to use on our website to 3 winners .  To enter simply leave a comment on the Elizabeth Craft Designs Facebook Giveaway Blog Post or the   Elizabeth Craft Designs Challenge post   and tell us  Which of the new Silk Microfine Glitter Palettes  is your favorite, Earth, Beach or Bloom? We will select 3 lucky winners in a random drawing  The winners will be announced on Friday, May 18th on the  Elizabeth Craft Designs blog  and our Facebook ...

Joset's New Release Backyard Barbecue

Image
Hello My Crafty Friends! Here is a second card I did using one of Joset's new releases the Backyard Barbecue and Lanterns .  I had just seen the Impossible Card and when I saw the BBQ set and the Lanterns I knew I had to make this card. Step 1   For how to video on making the card base go to this LINK Step 2   Cut off white cardstock 3-1/2" X 4-1/4" emboss with "Brick" embossing folder.  Using Clear Double Sided Adhesive adhere to center pop up section. Step 3  Die cut all pieces you wish to use on your card using Joset's newly released Backyard Barbecue and Lanterns die sets.  For picnic table use 1/4" strips of brown cardstock.  Using Clear Double Sided Adhesive build your card scene. Step 4   Using A Way With Words - 4 Seasons die set cut Summer 1 from green cardstock with Clear Double Sided Adhesive on back and 1 from off white cardstock.  Adhere green on top of off white off setting a bit to give shadow effect. I do hope you ...