Posts

Showing posts with the label Pine Boughs

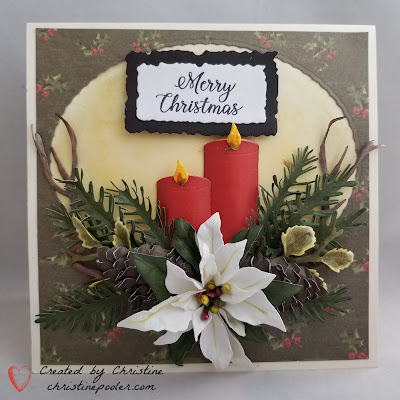
Merry Christmas Double Candle Oval
Image
  Hello my crafty friends, Today I have another Christmas card that I created using Susan's new Holiday Flora Release .  I have used the Poinsettia, Pinecones & Evergreen Boughs, Winter Boughs & Evergreen Shrubs and candles from Garden Lantern. Card is 6" X 6"off white cardstock tent fold. Patterned paper was cut 5-3/4" square.  Using Oval die cut opening in patterned paper evenly lining up die so top and 2 sides have equal distance which leaves about 2 inches on bottom.  Laid on card front and lightly traces around oval removed pattern piece and used distress inks to create a back ground.  (Old Paper and Scattered Straw were used here)  Erased oval pencil mark then using Clear Double Sided Adhesive attached patterned paper to card front lining up oval opening over inked area. 4 candles were cut from red cardstock and stacked together attaching with Barely Art Glue creating 2 candles.  1 candle was cut shorter and a small slit was made in top...

Plaid & Pine Cones Slimline Card

Image
  Hello my crafty friends! Today I have a slimline card adorned with Pinecones, Pine Boughs, Mistletoe and Winter Foliage from Susan's Garden Club new Holiday Release you are going to want it all in this release.   Card base is white cardstock cut 8-1/2" X 9" scored at 4-1/4" folded on score line.  Pattern paper was cut 8-3/4" X 4"  then chose a rectangle die that would fit my sentiment and cut a rectangle into left side of my pattern paper.  Pattern paper was place on card front using a pencil lightly traced around opening then removed pattern paper.  Black ink was used to stamp sentiment within the rectangle then pattern paper was  adhered to card front using Clear Double Sided Adhesive .  From white cardstock a slimline frame was cut then adhered to card front using Clear Double Sided Adhesive . To adorn this card I used Pinecone & Evergreen Bough, Mistletoe, Evergreen Shrub and Holiday Quotes from Susan's new Holiday Release ....

Double Z Fold Lantern Card

Image
  Hello My Crafty Friends - Welcome to my blog. Today my card is a Double Z Fold c ard with Susan's new Garden Lantern w/ Candle, Poinsettia, Winterberry and Pine Boughs .  Another fun fold card to create and show off Susan's new Christmas Release . Base is white cardstock 6" X 12" scored at 3" and 6" mountain fold at 3" score line valley fold at 6" score line.  Brown ink used on all edges.  2 pc of red cardstock cut 2-3/4" by 5-3/4" and 1 pc 5-3/4" square adhere red cardstock pcs to card base using Clear Double Sided Adhesive . 3 pc of pattern paper 2 cut 2-1/2" X 5-1/2" and 1 pc cut 5-1/2" square adhere to red cardstock using Clear Double Sided Adhesive.   White cardstock cut 4-1/2" X 9" scored at 3" and 6"  edged with brown ink 3" score mountain fold valley fold at 6" score.  3 pc of red cardstock cut 2-3/4" X 4-1/4" adhered to white cardstock using Clear Double Sided Adhe...

Woodland Wreath with Poinsettia & Pine Cone

Image
Hello my crafty friends, welcome to my blog! Today my Christmas card was created using the brand new  Susan's Garden Club Woodland Wreath along with Poinsettia, Pinecone, Pine Boughs, Winter Boughs & Evergreen Shrubs and added a bit of snow. For my card today I used a tan colored cardstock to create a 6" X 6" card base (mine is tent fold so whatever your preference is).  Dark brown cardstock was used for mat layer cut 5-3/4" square adhered to card front using Clear Double sided Adhesive .  Patterned paper was cut 5-1/2" square and adhered in same manner.  Patterned paper was purchased years ago in a little scrapbook store that is not longer there.  I loved this paper and have saved all this time and decided it was time to use it. For the wreath two different brown cardstocks were used to cut 4 Woodland Wreaths used some brown ink to add shade.  I did some pinching up on each of them to give them dimension.  Using Kids Choice Glue to attach to ca...

Lighted Lantern

Image
Hello my crafty friends,  Yippee Susan's new Christmas Release should be out next week and once they are available I will be adding links to the new items to list below. I so hope everyone is  having a great summer.  I know it has been some time since I posted but I have been busy with yard work and also busy creating cards for Susan Tierney-Cockburn's Christmas Release with Spellbinders.   Yes it is the perfect time to be making Christmas Cards.  Just think that pressure will be taken away if you do them now with Susan's wonderful new Christmas release.  It is Christmas in July!  My card today uses 4 of her new die sets. My card today is a 6 X 6 card base and it is lighted. Card is a 6" X 6" tent fold card created from white cardstock. Red cardstock was cut 5-3/4" square.  Attach to card front using Clear Double Sided Adhesive . The black & white design paper was cut 5-1/2" square adhered to card front using Clear Double Sided Adhesive. Spel...

Happy Birthday Friend

Image
Welcome to my blog my friends, Today I am posting a birthday card that I made for a very special friend since grade school which is a very long time trust me hehehe.  Obviously being December 1st I have done a wintery card Here is how I created my card. Step 1  Cut 2 (1 with Clear Double Sided Adhesive on back and 1 without adhesive)  Garden Notes Berry Branch from brown cardstock.  Adhere 1 on top of other.  Add berries using Nuvo Crystal Drops Simply White.  Set aside to dry then repeat on the back. Step 2  Cut 2 Garden Notes Hawthorne from green cardstock and shade.  Using Nuvo Crystal Drops Autmun Red add berries set aide to dry then repeat for back side.  Susan has a good video which can be found here . Step 3  Form 6" X 6" card base. Cut brown cardstock 5-3/4" X 5-3/4" using 6th die in Garden Notes Frame It / Stitched Squares cut opening in upper left.  Cut patterned paper to fit opening ( ModaScrap Woods used here) ad...

Seasons Greetings Cornucopia

Image
  Hello my crafty friends welcome to my blog. Once again it is challenge time for Elizabeth Craft Designs Design Team.  This month our challenge is to create a Christmas card using flowers and or foliage.  My card today uses Susan's Garden Notes Small Poinsettia ,  newly released Hawthorne Berries and Pine Boughs along with new Garden Notes Cornucopia . Be sure to visit Elizabeth Craft Designs Blog to see what all the other design team members have created and enter for a chance to win  $20.00 gift card.  The question for this month is -  Which Elizabeth Craft Designs flower or foliage die or stamp set would you chose to create a Christmas card or decoration.   Here is how my card was created. Step 1   Cut 2-3 Garden Notes Hawthorne Berries from either green cardstock or white Soft Finish Cardstock .  If cut in green cardstock shade using Distress Ink if cut in white color with alcohol markers (green cardstock used here)....