Posts

Showing posts with the label happy

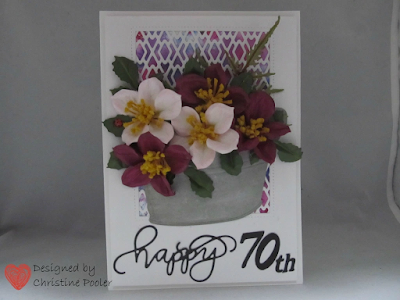
Lenten Rose 70th

Image
Hello my crafting friends, welcome to my blog! Today I have a card I created for a dear friend that has been my friend since childhood. Our birthdays are a week apart and we have been exchanging birthday cards for many years. My card was created using Susan's Garden Club Helleborous, Japanese Painted Fern, Galvanized Bucket, Tonic Studios - Patterned Panels - Deco Diamonds and Nuvo Shimmer Powders . Step 1 Using Craft Perfect Watercolor Paper and Nuvo Shimmer Powders in colors of your choice sprinkle powders onto watercolor paper lightly spritz with water continue until you like the results. Set aside to air dry. Cut to size of diamond panel. Step 2 From white cardstock die cut 1 Deco Diamond Panel . Step 3 Cut 1 piece of white cardstock 4-3/4" X 6-3/4" then using a rectangle die just a little smaller than the diamond panel cut rectangle in upper portion of cardstock. Step 4 Using Nuvo Deluxe Adhesive attach panel over the colored piece then center behind...

70th Birthday Calla Lilies

Image
Welcome My Crafty Friends! Wow it has been more than a month since my last post as we have had a lot going on. As we all know life does get in the way of our crafting sometimes but I am back now and it seems great.  I have really missed making cards but there was just no time. My card today uses Susan's Garden Notes Calla Lily, Cosmos, Ladder Fern and Stitched Rectangle Frame It along with Elizabeth Craft Designs Stitched Fishtail Banners .  My little background feature was done using Brusho Watercolor Powders and coffee filter. Here is how I created my card. Step 1   Create background piece using glossy photo paper, coffee filter and watercolor powders Susan has a video on her Facebook page Susan's Garden Club found here Step 2   Form 6" X 6" card base from 110# white Soft Finish Cardstock . Step 3   Cut white Soft Finish Cardstock 5-3/4" square.   Using Garden Notes Frame It/Stitched Rectangles cut rectangle on right side using size of your ch...

Thank Ewe

Image
Welcome my crafty friends!  Happy New Year to all it has been a while since I posted anything so to start I wanted to share my thank you cards that I created .  No tutorial just wanted to share they are so easy. Thanks for stopping by I have a couple of posts that I am working on now just need to finish tutorials. Thank you for taking the time to stop by today! Until next time - Happy Crafting! Christine

Challenge - Garden Notes Frame It / Stitched Inspiration

Image
Hello my Crafty Friends welcome to my blog.  Today is a new challenge on Elizabeth Craft Designs Blog .  This month it is Garden Notes Frame It / Stitched Inspiration using Susan's garden Frame It Stitched dies.  I chose to use the squares along with Garden Notes Wheelbarrow and Windflowers.   Be sure to visit Elizabeth Craft Designs Blog to see all the great creations by all the design team members and of course answer the question  for a chance to win a gift card.  https://blog.elizabethcraftdesigns.com/2018/12/elizabeth-craft-designs-designer-challenge-december-2018/ .  The question this month is Which of the Garden Notes Frame It / Stitched die sets would you use on a project and how would you use it.   Here is how card was created. Step 1   Form 6" X 6" card base. Step 2   Cut patterned paper 6" X 6" ( ModaScrap Relax in the Garden used here) adhere to card front using Clear Double Sided Adhesive . Step 3   Cut 6" X 6" wh...

Sunflower Birthday

Image
Welcome my crafty friends so glad you stopped by today.  My creation today is a card I made for my boss's birthday using Susan's Garden Notes dies. Here is how it was created. Step 1  From brown cardstock with Clear Double Sided Adhesive on back die cut branch  twice using Garden Notes Berry Spray adhere 1 on top of other using red Nuvo Crystal Drops add berries to branch set aside to dry then add berries to back side then let dry. Step 2   From green cardstock with Clear Double Sided Adhesive on back cut 2 stem using Garden Notes Lavender die set.  Die cut florets from yellow cardstock approximately 16 times.  Lay on hard rubber art eraser using toothpick cup each floret.  Using Kids Choice Glue add florets to branches front and back. Step 3   Die cut, color and shape 3 sunflowers from white Soft Finish Cardstock using Garden Notes Sunflower 2 . Step 4   Using newly released Garden Notes Hosta die set cut several leaves from whit...

July Designer Challenge

Image
    Hello My Crafty Friends Welcome to My Blog! Once again it is time for the ECD Designer Challenge.  The challenge this month is to use Joset's Blackboard Alphabet and/or Blackboard Numbers die sets.   The question for the $20.00 giveaway this month is  What Elizabeth Craft Designs die or stamp set would you use the Blackboard Alphabet or Blackboard Numbers die sets.   Be sure to visit Elizabeth Craft Designs Blog at this link to see all the creations our Design Team have created using these dies and to enter for a chance to win. Here is how my card was created: Step 1   Create card base 5" X 7". Step 2   Cut patterned paper / cardstock 4-3/4" X 6-3/4" .  Using #6 square die of Susan's new Stitched Frame It Squares die set cut square into the right side of the patterned paper.  Adhere paper to card front using Clear Double Sided Adhesive .  (Note: I number the back of my dies starting with smallest being #1) Step 3 ...

Happy 4th

Image
Hello my crafty friends welcome to my blog and Happy 4th of July to all that celebrate it! Today I have a quick little post for you.  I like to make treat boxes for different holidays for my co-workers fill them with some candy and have a prize for 1 lucky winner.  So when A Way With Words came out with this new Gable Box I just had to use it. Made a total of 24. Here is how I did it. Step 1   From white Soft Finish Cardstock using A Way With Words Gable Box die cut t box. Step 2   Using yellow ink random stamp stars on box using Joset's Summer Fun Sentiment Stamp Set. Step 3   Crease on all fold lines well then assemble box using Clear Double Sided Adhesive . Step 4   Using Joset's 4th of July die set cut flag and large burst.  Attach burst to box front using a bit of Clear Double Sided Adhesive then add a bit of Kids Choice Glue on back of flag pole attach to box. Step 5   From black cardstock with Clear Double Sided Adhesive on back...