Days Gone By
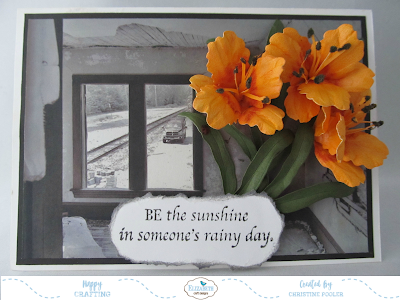
Hello everyone, thanks for stopping by my blog today! Today my card was inspired by the orange Day Lilies that are in bloom right now in Central Maine and a picture that was posted on Facebook by Paul Morin who lives a couple towns north of me. He posts some nice photos (I did message him and asked permission to use the photo).
Let's get to it!
- Card base: Cut white cardstock 7" X 10" score at 5" fold on score line to form base which is going to be a tent fold.
- Cut black cardstock 6-3/4" X 4-3/4" adhere to card front using Clear Double Sided Adhesive.
- Cut patterned paper 6-1/2" X 4-1/2" (In my case I printed the picture onto cardstock and cut to size) adhere to black cardstock using Clear Double Sided Adhesive.
- Create 3 lilies using newly released Garden Notes - Day Lily and White Soft Finish Cardstock . Using PanPastels color petals and stamens. Lay petals face down on molding mat using large end of loop tool from Susan's Garden 4 pc Tool Kit shape petals turn over take medium ball tool from tool kit push into center of petals cupping them. Use Kids Choice Glue to attach petals together placing larger set of petals on top of smaller set of petals. Take stamen cut each stamen in half add Kids Choice Glue along bottom edge leaving small tab free of glue - using fine point tweezers from tool kit roll up holding for a few seconds to let glue set up. Dip ends of stamens in glue then into black pollen. Dab bottom of stamen into glue and add to center of lily. You can set flowers into egg carton to let them dry and take shape. Cute stems and leaves from green cardstock shade with ink then shape by laying on leaf mat use leaf tool from tool kit to put vein line down middle. Pinch up lay right side down on molding mat rub tips of leaves with medium ball tool from tool kit.
- Build your lilies on left side of card using Kids Choice Glue.
- Using sentiment of your choice stamp on piece of White Soft Finish Cardstock using black ink. Tear around all edges then ink edges. Adhere to card front using dimensional tape. (My sentiment is from Susan's new clear stamp set Little Words That Mean A Lot)
I do hope that you have enjoyed this little tutorial today. Be sure to visit
Elizabeth Craft Designs to see all the great products they offer.
Until next time - Happy Crafting!
Christine

.jpg)

Beautiful ...again. Thank you for sharing
ReplyDeleteThank you so much!
ReplyDelete