You Take the Cake

Hello my crafty friends welcome to my blog. Well the weather here in Maine is 100% better this week than last when we got 30" of snow in one storm. Today I am posting a birthday card I made showcasing Susan's new Rose 3 die set.
Here is how it was done.
- Cut white Soft Finish Cardstock 6" X 10" score at 5" fold on score line.
- Using Karen Burniston's Cake Pop Up die center in card fold (I use a little removable tape to hold in place when cutting) run through cutting machine. Work all folds to make cake pop out. Karen has a great video on this die cut which can be found here.
- Using design paper of your choice and dies from the set cut out decorative cake pieces. A piece was cut to cover top of cake using same paper and laying just very top portion of cake die then cutting the candles pieces away and trimming to fit. (Covering the top is not necessary it is just something I wanted to do.)
- Once cake is completely decorated random stamp inside of card in colors that match paper. Close to My Heart Ink Blot Flair stamp set used on this card.
- Cut colored cardstock 6-1/2" X 10-1/2" (which is what I did here as it gives a little border) or 6" X 10" which fits exactly over cake insert and will fit in envelope for 6" card. Score in center and fold.
- Add Clear Double Sided Adhesive to back of cake insert avoiding area where cake pop up is. Attach the insert to inside of cardstock lining up at fold. Remove protective covering from adhesive on half of insert adhere then repeat for other half.
- Cut 2 pieces of decorative paper 6-1/2" X 5" attach to front and back of card using Clear Double Sided Adhesive.
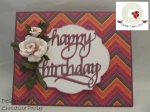
- From white Soft Finish Cardstock cut label using largest die from Karen Burniston's Labels & Circles. Ink edges using Antique Linen Distress Ink.
- Using Quietfire A Way With Words Happy Birthday 2 die cut two - one from cardstock used for card base and one from a coordinating cardstock. Before cutting adhere Double Sided Adhesive to back of cardstock. Adhere one on top of other offsetting just slightly so there is a shadow. Adhere to label then adhere to front of card.
- From white Soft Finish Cardstock and Susan's Garden Notes Rose 3 cut enough petals to make 1 rose and 1 bud. Shade using pink PanPastels Set 1 then shape using Susan's 4 pc. Tool Kit and Large Molding Mat. Using Kids Choice Glue assemble rose and bud. Use Susan's Rose 1 video as a guide video found here.
- Cut stem, leaves and Ivy Vine from green cardstock. Using Leaf Tool and Leaf Pad make vein lines in leaves add shading using yellow green from PanPastels Set 1. Pinch right sides together lay face down on molding mat take medium ball tool roll on tip of each leaf to curl tip back.
- Arrange on left side of label attaching using Kids Choice Glue.
Elizabeth Craft Designs Supplies
1295 Susan's garden Notes Rose
1297 Susan's Garden Notes Ivy Vine
1208 Karen Burniston's Labels & Circles
1102 Karen Burniston's Cake Pop Up
PSF102 Soft Finish Cardstock - White
1161 Suzanne Cannon A Way With Words - Happy Birthday 2
30115 Susan's Garden PanPastels Set 1
814 Kids Choice Glue
808 Susan's Garden 4 pcs Tool Set
810 Large Molding Mat
811 Leaf Pad
Clear Double Sided Adhesive
Other Supplies
Close to My Heart paper - Sangria
Close to My Heart D 1660 Ink Blot Flair
Cardstock - green, eggplant, silver and yellow
Distress Ink - Antique Linen
Inks
Hope that you have enjoyed this tutorial and will make your own card.
Be sure to visit Elizabeth Craft Designs for your supplies.
Until next time - Happy Crafting!
Christine

.jpg)
.jpg)
Comments
Post a Comment