Pitcher of Hydrangeas
Hello Everyone! Wow what is with all this crazy weather across the country. At least with bad weather it generally keeps us inside and what are you going to do but craft.
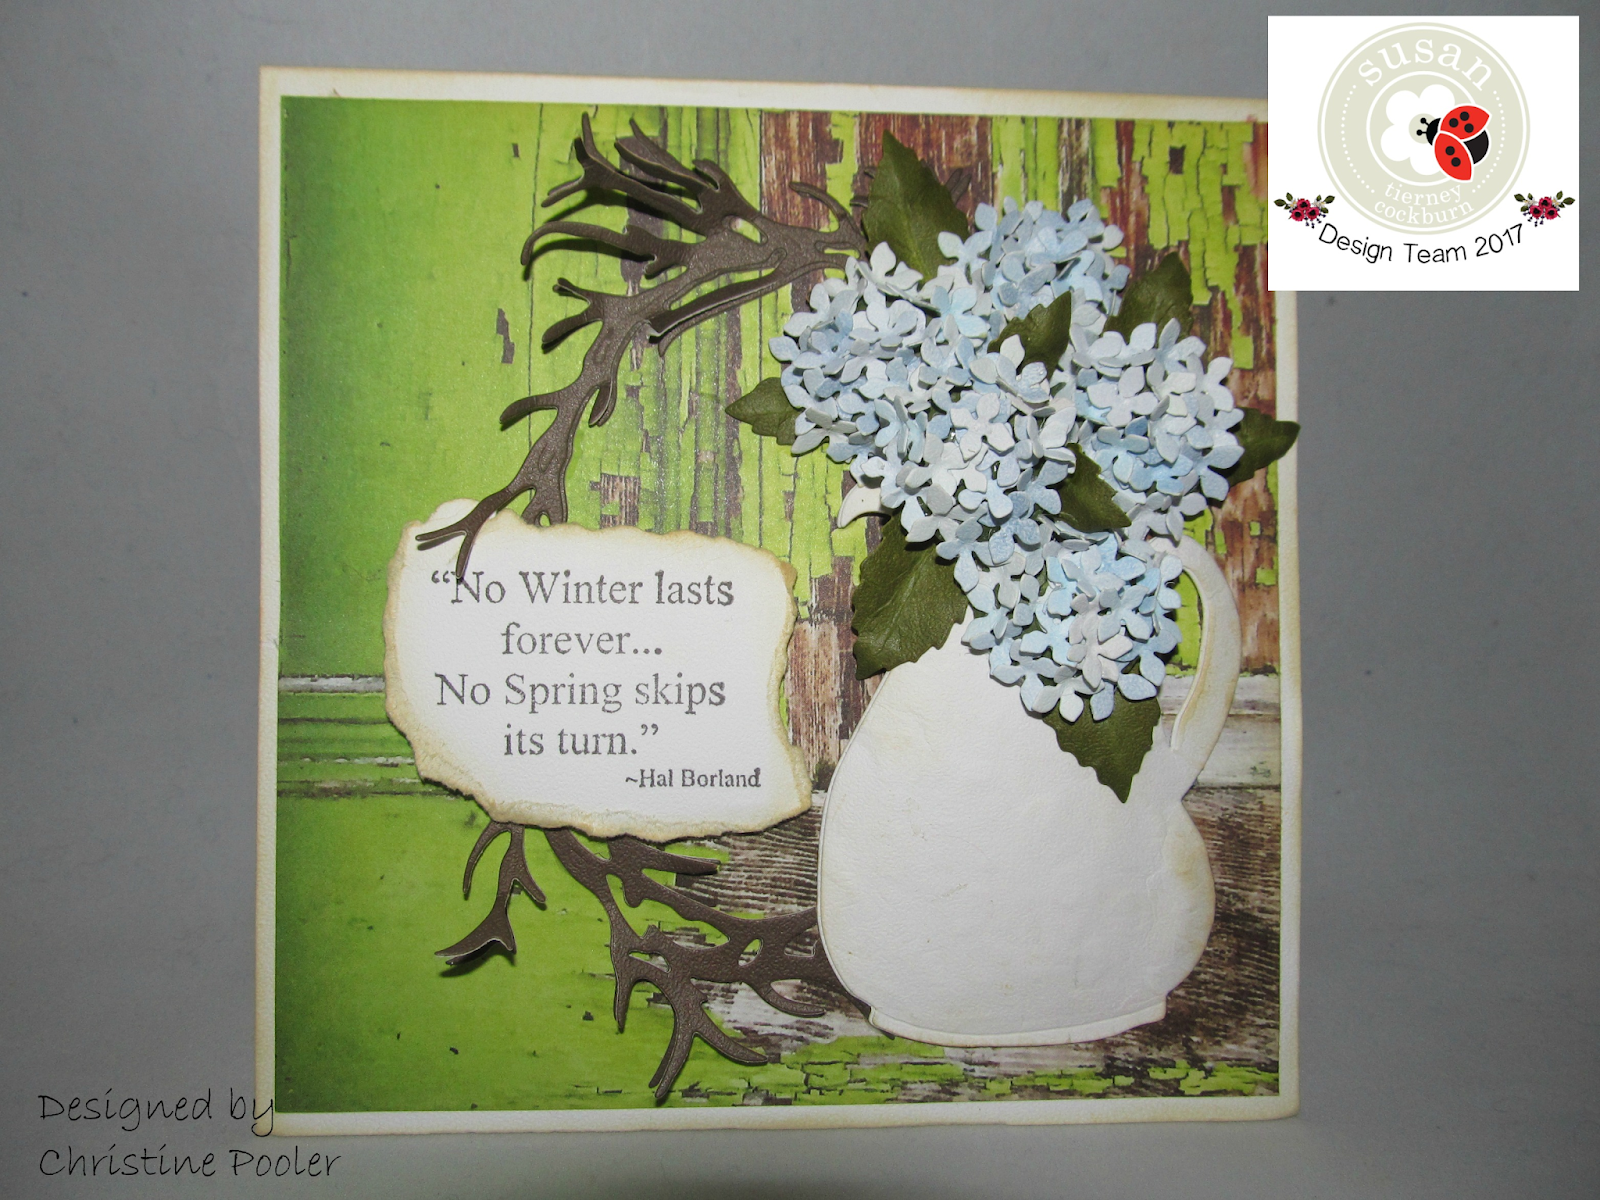
My post today was designed for Susan's Garden Design Team at Elizabeth Craft Designs. It features two of Susan's new dies that are SOON TO BE RELEASED. The two new dies are Hydrangea 2 and Pottery Pitcher.
Here is how I made the card which is a 6" X 6".
- Cut Soft Finish White Cardstock 6" X 12" score at 6" fold on score line forming card base. For this card I made it a tent fold but can also be turned and used as side fold. Cut 1 piece of printed paper 5-3/4" X 5-3/4" (Els Through the Lens - Wood paper pack used here). *Note: all edges of card, printed paper, pitcher and sentiment are edged with Antique Linen Distress Ink. Adhere printed paper to front of card using Clear Double Sided Adhesive.
- From Dark Chocolate Soft Finish Cardstock cut 2 wreaths using Susan's Garden Notes Square Grapevine Wreath. Edge all around each wreath with dark brown ink (Vintage Photo Distress Ink used here). Using Kid's Choice Glue glue 2 wreaths together just around the very center leaving the branches free of glue. Separate the top branches from bottom branches giving wreath some dimension. Adhere to front of card using Kid's Choice Glue being careful not to glue the branches down.
- Cut 2 Pottery Pitchers (Coming Soon ) from White Soft Finish Cardstock that has Clear Double Sided Adhesive on 1 side. (place pitcher die face down on the cardstock side to cut). Peel back protective covering on 1 pitcher being careful not to touch adhere to other pitchers. Using Antique Linen Distress Ink to ink edges of pitcher. Lay right side down on molding mat with large ball tool from Susan's Tool Kit rub over the entire back of pitcher and handle to give it some dimension.
- Take a piece of 85# White Soft Finish Cardstock and PanPastels in shades of blue green and pink sponge all over cardstock leaving small patches of white throughout. Using Garden Notes Hydrangea 2 die set (Coming Soon) cut florets at least twice for each hydrangea. Place each floret on hard rubber mat right side up with small ball tool cup each one.
- Using Olive Twist Soft Finish Cardstock cut 10 stems and each leaf several times. Edge all with green ink (Bundled Sage Distress Ink used here). Lay leaves face down on leaf mat using leaf tool add stem lines. Pinch leaf back to raise stem line highlight with PanPastels Bright Yellow Green. Lay right side up on leaf pad using leaf tool add vein lines. Pinch right sides together lay face down on molding mat rub tip with ball tool making it curl. Add stem line on 5 of the stems glue each one on top of the remaining 5 stems using Kid's Choice Glue. Susan has a great video that shows how to do the leaves and assemble the flowers it can be found here.
- Add hydrangeas to pitcher arranging to your liking down through slot in top of pitcher adhere to back of pitcher using Kid's Choice Glue. Being very careful to add glue to just very edges of pitcher put glue all around pitcher adhere to left side of wreath.
- Stamp sentiment using black ink onto piece of White Soft Finish Cardstock which is big enough for sentiment and extra to tear away. Ink edges with Antique Linen Distress Ink. Using dimensional tape or squares adhere to right side of wreath.
ECD Supplies
Garden Notes - Hydrangea 2 (Coming Soon)
Garden Notes - Pottery Pitcher (Coming Soon)
Garden Notes - Grapevine Wreath - Oval
Soft Finish Cardstock - White, Dark Chocolate and Olive Twist
PanPastels - Set 1 & 2
Susan's 4 pc Tool Set
Large Molding Mat
Leaf Pad
Els van de Burgt Through the Lens - Wood Paper Pack
Susan's Seeds of Thought Stamp - Winter Spring
Kid's Choice Glue
Other Supplies
Black Ink
Dimensional tape or squares
Distress Ink - Antique Linen, Vintage Photo and Bundled Sage
I am so hoping that you have enjoyed this tutorial and that it has gotten your creative juices running. Be sure to visit Elizabeth Craft Designs for all your great supplies.
Until next time...... Happy Scrapping!
Christine

.jpg)

Wow, so much work has gone into this. But worth it, because the card is a stunner! I have a soft spot for jars/pitchers so this is right up my street.
ReplyDeleteThank you for your kind words!
ReplyDelete