Jasmine & Roses
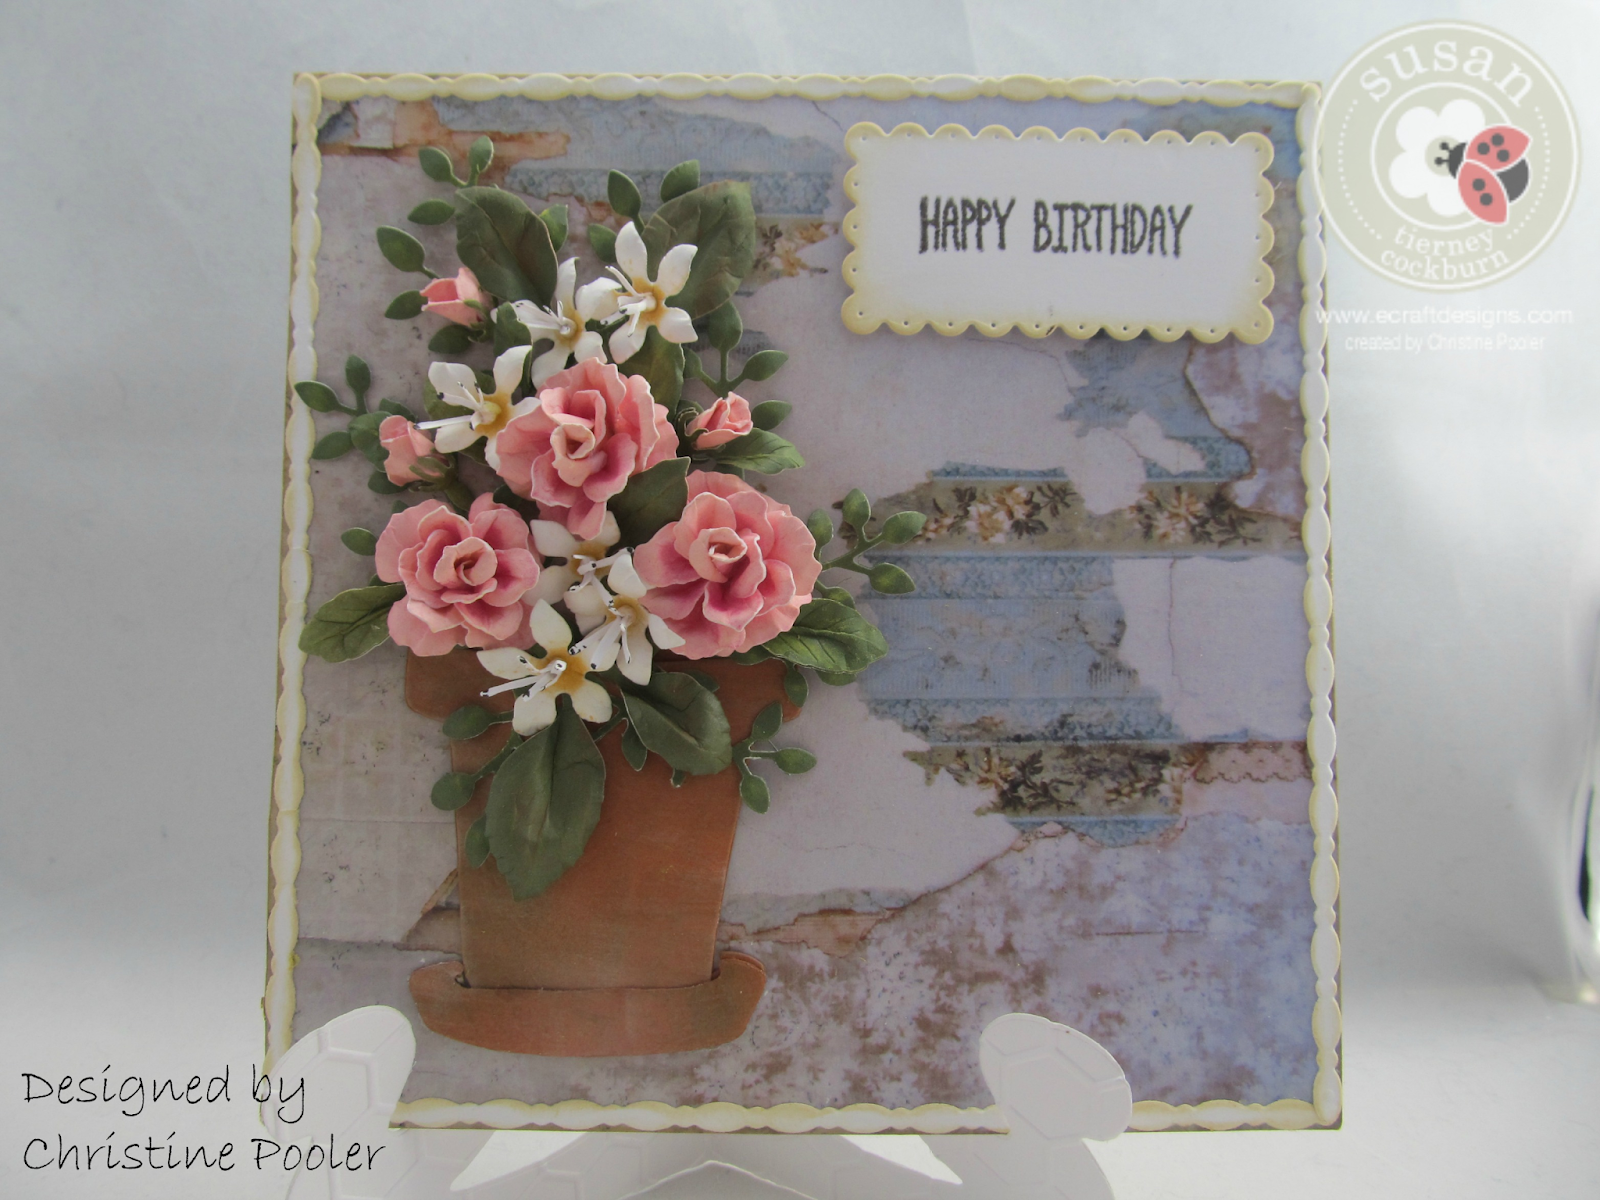
Today my post is another card inspired by my recent tour of the Olson House in Cushing, Maine. I believe as a crafter we look at everything in a different way at least I do. I am sure some of those that were in our tour group probably thought that I was a “tad bit” crazy when I got so excited over the peeling wallpaper, cracked walls and wide painted floorboards and proceeded to take pictures of these items. The background paper I used today is from my picture I took of the peeling wall paper then printed on cardstock. When I was looking at the wall that day I could just picture some of Susan’s Garden Note Roses on that background.
I have chosen Susan’s new soon to be released Susan’s Garden Note Plant Pot die using her Garden Notes Rose 2 and Jasmine from her previous releases. I also used Els Leafy Branch, Dotted Scallop Rectangles, Bead Strings 1 and Joset Designs General Sentiments stamp set. I know it is another card with roses but I just love them and I think that sometimes they can take a nice card and make it a wow card at least in my opinion.
Let us get started.
Card Base: 6" X 6"
- Cut white cardstock 6" X 12" score at 6".
- Choose a printed paper for background - mine is one I printed from a photo I took. Cut paper 6" X 6" attach to card front using clear double sided adhesive. Note this card can be a top fold or side fold it is your choice.
- Cut 4 matching pieces from Bead Strings 1 ( you have a choice of 4 I chose one of the straight ones) using white cardstock with clear double sided adhesive on the back. At the same time cut 1 Dotted Scallop Rectangle using smallest die but do not back white cardstock with adhesive for this piece.
- Ink all edges (Distress Antique Linen used here).
- Attach beaded strings around outer edges.
Flower Pot:
- Cut 2 pots and 2 saucers from terra cotta cardstock.
- On 1 pot and saucer using green and white ink and makeup sponge shade to give it aged look.
- After shading lay shaded pot and sauce face down on molding pad. Using loop tool from Susan's 4 piece tool kit pull loop down through the pot and saucer to give it dimension.
- Attach flat pot and saucer to card front using clear double sided adhesive (I left little piece in top of pot on this one and adhered)
- Using clear drying glue on very edges of pot (even tiny rim area) and saucer all around attach over one already attached to card. Make sure you leave center of pot open and free of glue as that is where you will arranging your flowers.


Flowers and Foliage:
- Cut 3 roses from pink cardstock. Shade centers of all petals with PanPastels Set 1 Magenta.
- Using green cardstock cut leaves and stems shade with PanPastels Set 1 Bright Yellow Green.
- Shape roses, leaves and stems using Susan's video as a guide you can find it here. This video is very helpful I refer to it often.
- Cut 6 Jasmine flowers and stamens from white cardstock and stems and leaves several times from green cardstock using Susan's Garden Notes Jasmine die. Shade center of each flower with yellow PanPastel Set 1. Lay flowers face down on molding mat and with small loop tool pull tool from top to bottom shaping petals. Turn flowers over and with small ball tool push into center cupping each flower. To form stamen spread a small amount of clear drying glue on bottom of stamen and roll up using tweezers starting at tab end.. Spread stamen out and with black marker make small dots on each stamen. Attach stamen to center of each flower using clear drying glue. Place leaves and stems face down on leaf molding pad and with leaf tool draw vein line down center of each leaf. Turn leaves over add Bright Yellow Green PanPastel and Rust PanPastels from set 1 for shading. Using tweezers pinch bottom of each leaf and lay on molding mat face down rub end of leaf with medium ball tool to add shape.
- Cut 2-3 Leafy Branches from green cardstock add shading using Bright Yellow Green PanPastels set 1. Lay face down on molding mat using med ball tool rub each leafy gently to give a little shape turn over and gently rub stems in several areas to give more dimension.
Arranging Flower Pot:
- Layout your Leafy Branches arranging until you are happy with it putting stems down in hole of pot. When happy with arrangement use clear drying glue to attach ( just a few dots on stems here and there). I cut some apart and even had some hang over edge of pot.
- Next add Roses and buds (once again I cut them apart cutting buds and leaves off and a little bit of bottom of stems).
- Add Jasmine flowers in same manner. Experiment until you get the look you want.
Adding Sentiment:
- Stamp sentiment on die cut rectangle using black ink (Happy Birthday used here but this card could be used for many things).
- Attach rectangle to top right corner of card using dimensional tape.
Last but not least your card needs a stand to display it on Els has a how to video for making card stand here.
Elizabeth Craft Designs Supplies:
Susan's Garden Notes - Flower Pot
Susan's Garden Notes - Roses 2
Susan's Garden Notes - Jasmine
Susan's Garden 4 pc Tool Kit
Susan's Garden Molding Pad
Susan's Garden PanPastels Set 1
Els van de Burgt Studio Dotted Scallop Rectangles
Els van de Burgt Studio Bead Strings 1
Els van de Burgt Studio Card Stand / Easel
Joset Designs Stamp Set - general Sentiments
Other Supplies:
White, pink, green and terra cotta cardstock
Black, white and green ink
Distress Antique Linen ink
Makeup sponges
Fine tip black marker
I do hope that you have enjoyed this tutorial and that you will try making one yourself. Please visit Elizabeth Craft Designs for supplies for this card plus much more.
Until next time - Happy Scrapping!
Christine

.jpg)
.jpg)
Very nice !!!! Love the pot to !! Thanks for the help with the cactus last night !!
ReplyDeleteSent from my iPhone
>
Thank you Debbie. I really didn't do much on the cactus just a little shaping.
ReplyDeleteAnother stunning project--I'm so impressed with your detail!
ReplyDeleteThank you so much Susan. Your attention to detail when designing the dies makes it easy.
ReplyDeleteLovely card. The flowers are so pretty.
ReplyDeleteThanks so much!
ReplyDeleteGreat job. Its absolutely gorgeous!!
ReplyDeleteThank you Penny
ReplyDelete