Birthday Peony

Good Morning Everyone,
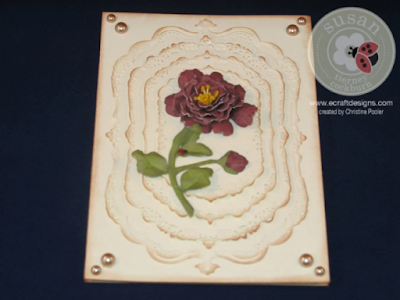
Today's post is a birthday card for a dear friend's Mom for her 88th birthday. Today's card is another easel card I seemed to be stuck on them at the moment.
Let's get started.
Making the card base see the tutorial here I did change the size a little to accommodate the Spellbinder dies.
(Cut your cardstock 4-1/4 X 12 score at 3", 6" and 9" and cut your front panel piece of cardstock 4-1/4 by 6)
Note: I used Close to My Heart Colonial White Cardstock and I distress edges of all my pieces with Distress Ink - Vintage Photo
With the card base done continue as follows
1. Using Spellbinder Gold Label Four dies cut the 4 largest dies using Colonial White cardstock.
2. Attach largest one to the front of the card using clear double sided adhesive and then the next 3 sizes and using pop dots or mounting tape stack them on each other centering.
3. Die cut a piece of Colonial White cardstock using the next to the smallest die and using the third smallest die and Vineyard berry cardstock cut 1 piece.
4. Stamp sentiment on the Colonial White die cut and then attach to Vineyard berry die cut using clear double sided adhesive.
5. Next cut and shape your peony using Susan's Garden Notes peony die and here video seen here and build on your card front.
6. Using pop dots or mounting tape attach the sentiment to the lower 3" segment of the card as a stand up helper.
7. Add pearls or gems to the four corners on the front and the lower two corners under the sentiment.
Supplies:
Elizabeth Craft Designs (be sure to check out this site)
Susan's Garden Notes - Peony #996
Susan's 4 pc Tool Kit #808
Mini Molding Pad
ECD Clear Double Sided Adhesive 6 mm #506
Other
Spellbinder Gold Labels Four #S5-159
Close To My Heart Cardstock Colonial White, Vineyard Berry, and Olive (olive used for the stem and leaves)
Close To My Heart Stamp Set D1560 Holiday Tags (Happy Birthday stamp)
Close To My Heart Stamp Set D1629 Just to Say (Enjoy Your Special Day stamp)
pearls from my stash
Distress Ink - Vintage Photo
I do hope you have enjoyed this post and that you will try it for yourself.
Until Next Time
Happy Scrapping
Christine

.jpg)

Comments
Post a Comment